Author Archives: Marketing

How to Maintain Your Boat’s Metal Surfaces

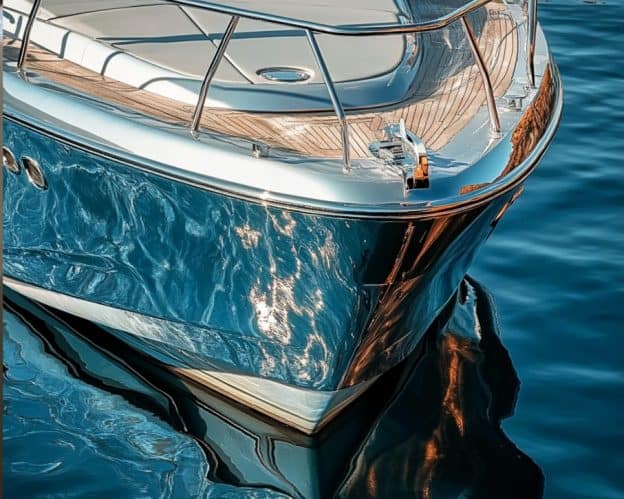
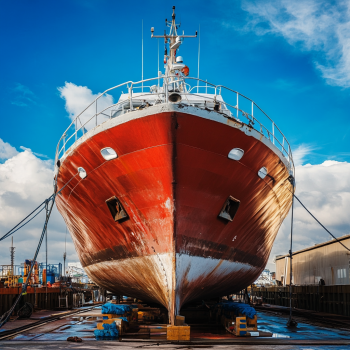
Nothing says “pride of ownership” quite like gleaming metal finishes on a boat. Whether it’s stainless steel, chrome, aluminum, brass, or bronze, well-maintained metal components not only elevate your boat’s appearance but also help preserve its overall value. However, the marine environment is notoriously harsh on metals, with rust, corrosion, and tarnish presenting constant challenges. In this blog post, we’ll explore how to maintain your boat’s metal surfaces for a long-lasting shine, provide a suggested maintenance schedule, identify common DIY mistakes, and share tips on preventing damage before it starts.

Why Maintaining Your Metal Matters

Marine metal surfaces face exposure to saltwater, sunlight, humidity, and constant contact with the elements. If left unchecked, rust and corrosion can deteriorate metal integrity, leading to costly repairs or replacements. With a proactive maintenance approach—backed by the right products and techniques—you can preserve your boat’s aesthetic appeal and structural reliability for years to come.

Suggested Maintenance Schedule

Keeping your boat’s metal surfaces in top condition doesn’t have to be overwhelming. By following a simple schedule, you can spread the workload across the year:

Weekly Rinse (After Each Outing)

Freshwater Rinse: Salt and minerals from seawater can accelerate corrosion. After each outing, rinse all metal parts with fresh water to remove salt deposits.

Mild Soap Wash: Once a week, if time permits, use a mild boat soap or marine-specific soap to gently wash metal surfaces. This step helps remove grime or dirt buildup that rinsing alone might miss.

Monthly Inspection and Polishing

Visual Check: Look for any signs of oxidation, pitting, or rust. Address issues early with a spot treatment to prevent deeper corrosion.

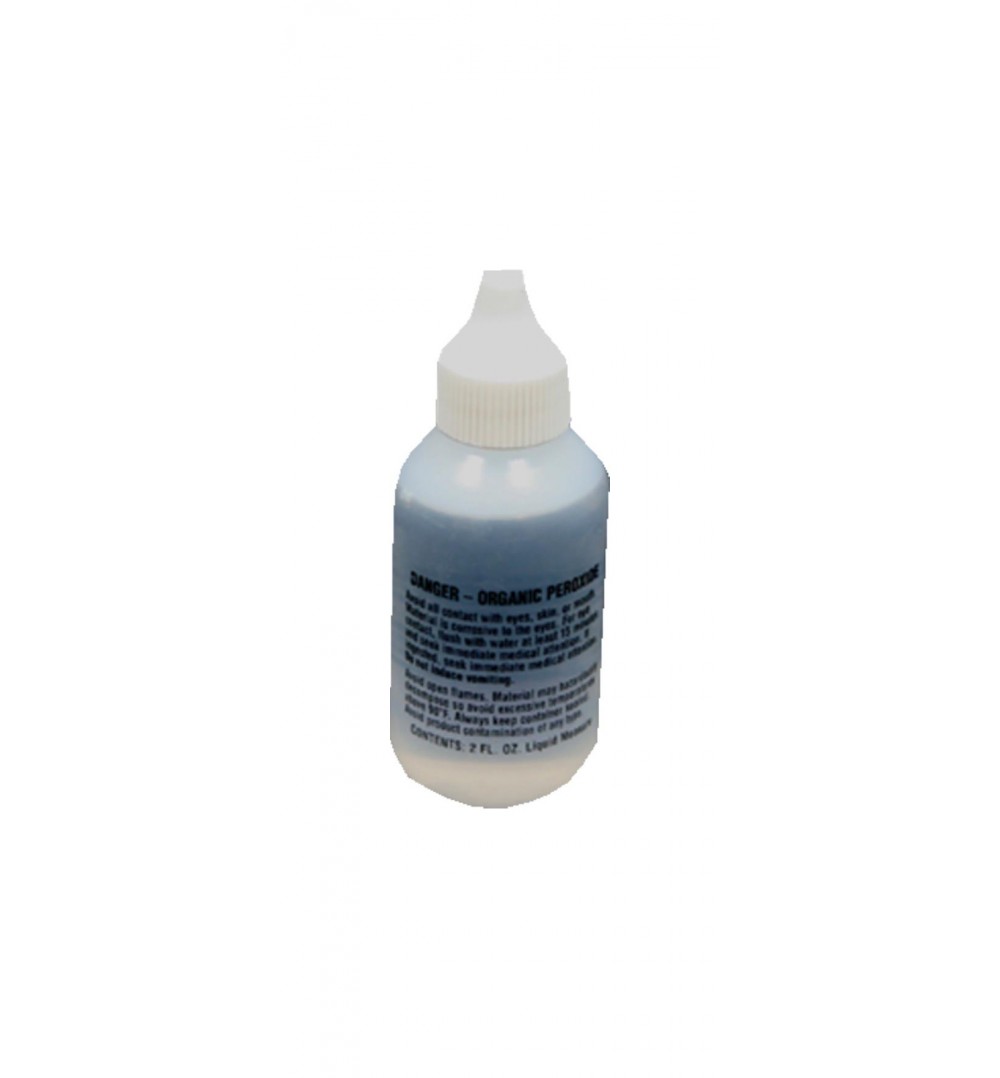
Light Polishing: Use a high-quality marine metal restorer and polish—like 3M Marine Metal Restorer and Polish—to remove minor oxidation or tarnish. Focus on areas that are starting to lose their luster.

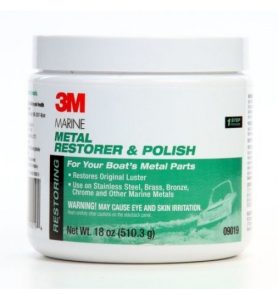
3M™ Metal Restorer and Polish rejuvenates the beauty of metals by removing surface rust, oxidation, corrosion and tarnish.

For bare aluminum use 3M Marine Aluminum Restorer and Polish. Use sparingly, a little bit goes a long way. We recommend testing on small inconspicuous painted areas to determine suitability.

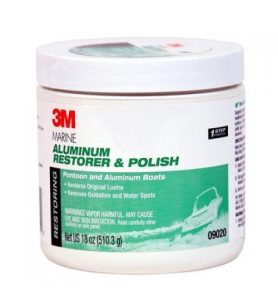
Removes oxidation growth and stains and restores a lustrous appearance to bare aluminum.


Quarterly Deep Clean and Restoration

Thorough Cleaning: Strip away accumulated dirt, oxidation, and tarnish using a recommended restorer. Pay special attention to hidden or hard-to-reach areas.

Protective Coating: Apply a protective wax or metal sealant if recommended for your specific metal surfaces. This additional layer of protection helps stave off harsh marine conditions.

Off-Season Care

Storage Preparation: If you store your boat off-season, do a final metal inspection and polish, then apply any protective covers or coatings.

Periodic Check: Even in storage, check occasionally for moisture or salt buildup that could lead to corrosion.

Common DIY Mistakes (and How to Avoid Them)

  1. Using the Wrong Tools

Mistake: Many new DIYers assume that any abrasive brush or pad will remove rust effectively. Unfortunately, the wrong tools can scratch or damage metal surfaces.

Solution:

Use soft-bristled brushes or non-abrasive pads specifically designed for marine use.

When in doubt, choose less abrasive materials and test on a small, inconspicuous area.

  1. Applying Excessive Force

Mistake: Scrubbing too hard in the hope of removing tarnish faster can do more harm than good. You risk scratching or permanently dulling the finish.

Solution:

Allow the restorer or polish (like 3M Marine Metal Restorer and Polish) to do the heavy lifting.

Gentle, consistent pressure is sufficient. If stubborn stains remain, reapply the product rather than increasing pressure.

  1. Skipping the Pre-Clean Rinse

Mistake: Jumping straight into polishing without removing loose dirt, salt, and other debris can grind these particles into the metal finish.

Solution:

Always rinse with fresh water before polishing.

This simple step removes contaminants that could lead to scratches.

  1. Ignoring Hidden Areas

Mistake: Overlooking or neglecting bolts, brackets, hinges, and other hard-to-reach places allows corrosion to develop unseen.

Solution:

Regularly check these areas for signs of rust, applying a suitable protective product when needed.

  1. Neglecting Ongoing Maintenance

Mistake: Thinking a single polishing session at the start of the season is enough. This approach leads to accumulated damage.

Solution:

Follow a regular cleaning and inspection schedule (weekly, monthly, quarterly) to maintain your metal surfaces and catch issues before they escalate.

Best Practices for Long-Lasting Shine

Choose Marine-Specific Products

Products formulated for boats are designed to handle the unique stresses of a saltwater environment. A general household metal polish may not provide the same level of corrosion protection.

Use Protective Coatings

After polishing, consider applying a protective wax, sealant, or ceramic coating (when appropriate) to create a barrier against salt and moisture.

Dry Thoroughly

After every wash or rinse, use clean microfiber cloths to dry metal surfaces and prevent water spots or lingering moisture.

Conduct Routine Inspections

Spot small issues early. If you notice a tiny rust spot or any discoloration, address it immediately to prevent further damage.

Watch Environmental Conditions

Keep an eye on high-humidity periods, frequent salt spray, or brackish water areas. In these cases, you may need to polish and protect metals more frequently.

Proactive Measures for Preventing Serious Damage

Protective Covers: If practical, use canvas or specialized covers to shield metal fittings from the elements when not in use.

Ventilation: Ensure your boat remains well-ventilated, especially if it’s covered or stored. Trapped moisture accelerates corrosion.

Zinc Anodes: Check and replace sacrificial anodes as needed. These help reduce galvanic corrosion for metals like aluminum.

Professional Assistance: If you encounter severe pitting or advanced corrosion, consult a professional for an in-depth assessment and repair. Early intervention can save you from costly replacements later.

Concluding Thoughts

Maintaining your boat’s metal surfaces involves a consistent care routine, the right products, and a keen eye for detail. By committing to a regular cleaning and inspection schedule—backed by gentle, appropriate tools—your boat’s metal fixtures can remain beautifully polished and protected for years to come. Avoid common DIY pitfalls like using excessive force or skipping essential steps, and address problem spots early to prevent lasting damage. With the right methods and a little discipline, you can enjoy a head-turning shine on the water season after season.

New Boat Models for 2025

The marine industry has been steadily evolving toward more efficient, more comfortable, and more sustainable vessels. In 2025, these trends have accelerated, giving rise to a new generation of boat models that combine cutting-edge technology, eco-friendly propulsion, and versatile design features. In this blog we highlight some of the new models making waves including some of the most exciting sailboats, powerboats, fishing boats, recreational vessels, and electric innovations making waves this year. By no means is this a complete list. 

A Sailboat With Sustainable Performance

Beneteau Oceanis 40.1 Hybrid

Beneteau’s Oceanis series has long been celebrated for its balance of comfort, performance, and affordability. For 2025, the Oceanis 40.1 Hybrid takes these qualities to new heights with:

  • Revolutionary Hybrid Propulsion
    The hybrid setup pairs a traditional diesel engine with an electric motor. This allows sailors to rely on the electric motor for silent, emissions-free cruising when entering harbors or navigating protected waterways. Diesel power remains available for longer crossings or when higher speeds are needed.
  • Extended Range and Reduced Environmental Impact
    A state-of-the-art battery system optimizes energy storage and usage, extending the electric range without compromising performance. The reduced reliance on diesel cuts down on both fuel costs and carbon emissions.
  • Advanced Hydrofoil Design
    Although not a full hydrofoiling vessel, subtle hydrofoil elements incorporated into the hull help reduce drag, increasing speed and improving overall efficiency. This design innovation also enhances stability, giving sailors more confidence in a variety of wind conditions.
  • Enhanced Creature Comforts
    Down below, the Oceanis 40.1 Hybrid features a bright and modern interior. Large windows, improved ventilation, and lightweight materials ensure a comfortable living space that aligns with Beneteau’s reputation for ergonomic design.

Hull Protection

Use a low-VOC Antifouling Paint: Since this hybrid emphasizes sustainability, a low-impact, water-based antifouling paint such as Interlux Aqua-One or Pettit Odyssey HD can protect the hull from marine growth while reducing harmful emissions.

Gelcoat Restorer: For above-water surfaces, use a gelcoat restorer (e.g., 3M Marine Restorer & Wax) to maintain the boat’s glossy finish.

Powerboats: Technology Meets Luxury

Sea Ray SLX 400 Outboard

Sea Ray has always pushed boundaries when it comes to blending comfort, style, and raw power. Their latest SLX 400 Outboard continues that tradition with a wealth of technological advancements:

  • Cutting-Edge Digital Helm System
    A fully integrated digital helm offers intuitive touchscreen controls, enabling the captain to manage everything from navigation and engine data to onboard entertainment at a glance.
  • Advanced Joystick Control Technology
    Docking and maneuvering large powerboats can be challenging, but Sea Ray’s joystick system simplifies the process, giving the captain precise control in tight spaces. This technology significantly reduces stress during close-quarter handling.
  • Mercury V12 Verado Outboard Engines
    With a pair of Mercury’s V12 Verado engines, the SLX 400 Outboard delivers smooth, reliable power. These outboards offer greater fuel efficiency and reduced noise levels, while still providing the thrilling acceleration that Sea Ray owners expect.
  • Integrated Digital Lifestyle Features
    From in-cabin climate control to streaming media and lighting systems, a centralized app-based interface ensures every aspect of onboard comfort is just a tap away. Passengers can stream music, adjust LED mood lighting, and even check real-time vessel diagnostics.

Upkeep of Luxury Upholstery and Finishes

Vinyl Cleaner & Protectant: Use a product like 303 Marine UV Protectant to protect the boat’s upholstery from fading, cracking, and UV damage.

Also, High-Gloss Marine Polish for the exterior surfaces and brightwork, a premium

Fishing Boats: Performance and Precision

Boston Whaler 405 Conquest

Boston Whaler is synonymous with safety and durability. Their 2025 405 Conquest takes this legacy a step further, catering to serious anglers and adventurous families alike:

  • Advanced Offshore Capabilities
    The hull design is optimized for offshore fishing and cruising, providing confidence and stability even in rough water. Reinforced construction and the iconic Boston Whaler unsinkable design ensure maximum peace of mind.
  • Integrated Fish-Finding and Navigation Technologies
    A suite of high-definition transducers, radar, and chartplotters offer real-time data on fish location, water temperature, and underwater topography. Coupled with GPS-enabled navigation, anglers can pinpoint the best fishing spots and stay on course in any weather.
  • Expanded Deck Space with Modular Design
    The 405 Conquest boasts a redesigned cockpit and deck layout, allowing users to adapt the space for fishing, entertaining, or cruising. Fold-out benches and removable seating modules let you switch from a roomy fishing platform to a comfortable social area in seconds.
  • Enhanced Stability in Challenging Conditions
    Whether you’re heading out for a day of deep-sea fishing or cruising the coastline, stability is key. Gyro-stabilizing systems help keep the boat steady, reducing roll and providing a smoother ride for everyone onboard.

For Offshore-Ready Hull Protection

Premium Antifouling Paint: A high-copper or dual-biocide paint (e.g., Pettit Triton or Interlux Micron CSC) is ideal for a boat frequently used in open water, as it effectively wards off aggressive marine growth.

Hull Cleaner & Descaler: For removing salt deposits and tough stains, a mild acid-based hull cleaner (e.g., Hammerhead Marine Descaler) can be used carefully following the product’s safety instructions.

Recreational Boats: Family-Friendly Innovation

Yamaha 255XD WatersportCruiser

Yamaha’s reputation for reliability and ease of use is on full display in the all-new 255XD WatersportCruiser. Perfect for family outings or adrenaline-fueled watersports, this model combines versatility with cutting-edge technology:

  • Versatile Multi-Purpose Design
    The 255XD is equally adept at towing wakeboarders or hosting a relaxing afternoon cruise. Multiple seating configurations, ample storage, and a spacious swim platform make it suitable for both action-packed adventures and laid-back leisure.
  • Advanced Wake-Shaping Technology
    Integrated wake-shaping systems let you fine-tune the size and shape of the wave or wake, whether you’re wakeboarding, wakesurfing, or water skiing. The result is a customized, professional-level watersports experience without the need for extensive manual adjustments.
  • Integrated Entertainment Systems
    Onboard sound systems, customizable LED lighting, and easily accessible USB ports enhance the social atmosphere. Combine this with Yamaha’s user-friendly touchscreen controls, and you have a fully immersive entertainment suite right on the water.
  • Enhanced Safety Features
    Yamaha’s proprietary safety protocols include emergency engine cutoff systems, anti-slip flooring, and intuitive handling at low speeds. These features make the 255XD an ideal choice for families with young or inexperienced boaters.


To keep the Interior looking great

  • Marine-Grade Upholstery Cleaner: Use mild, non-toxic cleaners such as Boat Bling Vinyl Sauce to remove stains without damaging surfaces. Follow up with a UV-protectant.
  • Non-Skid Deck Cleaner: A product like JustTeak™ Teak Cleaner safely cleans traction mats and other surfaces without making them slippery.

Electric and Sustainable Innovations

X Shore Electric 2025 Model

X Shore has been a pioneer in electric boating, and their 2025 model cements their position at the forefront of eco-friendly marine travel:

  • 100% Electric Propulsion
    The new X Shore runs solely on electric power, eliminating direct emissions and significantly reducing operating costs. Its silent operation offers a more relaxing, nature-focused boating experience—perfect for lakes, rivers, and environmentally sensitive areas.
  • Extended Battery Range (up to 120 Nautical Miles)
    Improved battery technology and energy management systems allow the 2025 model to travel longer distances on a single charge. This opens up new possibilities for day trips and longer cruises without the anxiety of running low on power.
  • Solar Charging Capabilities
    An optional solar panel array can be installed on the deck or hardtop, harnessing the sun’s energy to recharge the batteries. While not sufficient for full recharges on its own, this green energy boost can extend range and reduce reliance on shore power.
  • Minimalist, Eco-Friendly Design
    With a focus on sustainability, the X Shore 2025 incorporates recycled and recyclable materials into its construction. The sleek, minimalist aesthetic not only looks modern but also reduces weight for greater efficiency.

Eco-Friendly Hull Care

Low-Impact Bottom Paint: Since the X Shore emphasizes sustainability, select a paint with minimal biocides or a slick, foul-release coating (e.g., SeaHawk’s Monterey Self Polishing Solvent Free Bottom Paint), which can reduce drag and keep the hull clean without harmful chemical leaching.

Biodegradable Cleaners: When washing down the deck and hull, use biodegradable marine soaps that won’t harm aquatic life. Consider Hammerhead Hull Cleaner.

Key Trends in 2025 Boat Design

Increased Focus on Sustainability
Hybrid and fully electric propulsion systems are becoming more common, responding to both consumer demand and stricter environmental regulations.

Advanced Digital Integration
From digital helm systems to fully automated navigation aids, technology is reshaping how we pilot and enjoy our vessels. Expect more touchscreens, wireless connectivity, and “smart boat” capabilities.

Improved Energy Efficiency
Innovations like hydrofoil elements, low-drag hull designs, and advanced battery systems are making boats lighter, faster, and more fuel-efficient.

Multifunctional, Adaptable Designs
Today’s boaters crave versatility. Modular seating, convertible deck spaces, and customizable configurations allow a single vessel to excel at multiple activities—whether that’s fishing, hosting, or watersports.

It’s an exciting lineup

The 2025 lineup of new boat models we’ve highlighted is a blend of cutting-edge technology, eco-conscious designs, and user-friendly innovations. From hybrid sailboats that glide silently through the water to powerboats boasting joystick-controlled maneuvers and eco-friendly electric cruisers, there’s never been a more exciting time to be on the water.

These boats not only offer superior performance but also reflect a broader shift in the marine industry—one that values sustainability, connectivity, and versatility as much as speed and luxury. Whether you’re an avid angler, a family seeking weekend adventure, or an eco-conscious yachtsman, 2025 has a model tailor-made for your needs. With these groundbreaking trends leading the way, the future of boating promises to be more innovative, more responsible, and more enjoyable than ever before.


Choosing the Right Bottom Paint for Your Region

How to fine-tune your bottom paint to adapt to your local waters.  

From freezing northern harbors to sun-drenched tropical marinas, the waters your boat navigates can dramatically affect the performance of your bottom paint. In my experience as a boat paint professional, selecting the right coating often comes down to understanding three major environmental factors: salinity, temperature, and local marine life. Here’s a closer look at how these variables influence bottom paint performance and what you should consider when choosing the optimal product for your region.


Salinity: Freshwater, Brackish, and Saltwater

Salinity describes how much salt is present in the water and can vary significantly between regions.

  • Freshwater Environments: Lakes and rivers typically contain less salt, which means that certain types of fouling organisms—such as barnacles—are less common. However, algae and slime can still accumulate quickly. In freshwater, a lower-copper or copper-free paint is often sufficient, with added biocides to combat algae growth.


  • Brackish and Coastal Waters: These waters have moderate salinity, creating a breeding ground for various marine organisms that could foul a hull. Many boat owners in coastal regions opt for medium-copper paints or hybrid formulations designed to counter a mix of algae, barnacles, and other mid-salinity fouling threats.


  • Open Ocean (Saltwater): High-salinity conditions are home to prolific barnacle and shell growth. Here, strong antifouling formulas containing higher copper content or advanced biocides are often key to keeping the hull clean. However, environmental regulations may restrict the use of certain high-copper coatings, so it’s wise to check local guidelines.


Biocop TF was developed as an alternative to tin-based antifouling paints to protect against the harshest marine environments.

Temperature: Cold vs. Warm Waters

Water temperature has a big influence on marine life cycles, growth rates, and overall paint performance.

  • Cold Water Regions: In colder latitudes, like the northern coasts, fouling tends to be slower but still occurs. Algae can thrive in cold waters, and barnacles—while less aggressive—can still latch on. Cold-water antifouling paints may focus on slow-release biocides to protect over longer haul-out intervals. Owners in these regions often appreciate a durable, hard paint that can withstand scraping or light ice contact in winter months.


  • Warm (Tropical) Waters: Warm waters accelerate the growth of slime, barnacles, and other hitchhikers that attach to your hull. Tropical climates also see year-round growth, leaving little downtime for these organisms. A high-copper or advanced biocide paint is usually recommended to handle persistent fouling pressures. Self-polishing or ablative paints that continuously release antifouling agents can also be beneficial in warm waters, as they maintain consistent protection throughout the season.

Talon is the top choice for a value-priced semi hard hybrid ablative marine bottom paint.

Local Marine Life: Beyond Barnacles

While barnacles are one of the most infamous hull invaders, each region hosts its own eclectic ecosystem.

  • Algae and Slime: Algae quickly grow on any submerged surface, especially in nutrient-rich waters. Slimy growth is common in both freshwater and saltwater but can be particularly aggressive in warm, sunny areas.


  • Worms and Tube-Building Organisms: Some coastal areas see tube worms and other encrusting organisms that bond onto hulls. These require paints with specific biocides targeting their growth cycles.


  • Regional Variations: In nutrient-dense estuaries, for example, there may be a higher risk of shellfish larvae attaching themselves. Conversely, mountain lakes might have minimal barnacle presence but still contend with algae and slime.


Selecting the Right Bottom Paint for Your Region

When choosing your bottom paint, consider the following:

Check Local Regulations: Some areas enforce stricter limits on biocides or copper levels. Always confirm compliance before selecting a paint.

Match Antifouling to Fouling Pressure: High-pressure areas require more potent antifouling formulas, while moderate or low-pressure waters might do well with multi-season ablative paints.

Consider Seasonal Changes: Even warm-weather regions can experience cooler periods that slow fouling. A paint formula effective across varying temperature ranges can be a worthwhile investment.

Assess Maintenance Schedules: If frequent hull inspections, dives, or cleaning are possible, a less aggressive coating may suffice. However, if your boat remains in the water year-round with minimal maintenance, invest in a paint specifically designed for extended submersion.


Closing Thoughts

Choosing the right bottom paint is as much about strategy as it is about science. By understanding how salinity, temperature, and local marine life affect fouling growth, you can better tailor your antifouling approach to regional conditions. Our professional advice is to start with a thorough evaluation of the waters you frequent and then match your bottom paint choice accordingly. An informed decision helps keep your boat’s hull clean, maintains its performance, and ultimately extends its life in the ever-changing marine environment. If you need any assistance feel free to reach out to the Bottom Paint Store customer service team for expert technical assistance. 


The Impact of Biofouling on Boat Performance and What You Can Do About It

Whether you own a small fishing skiff, a luxurious cruising yacht, or anything in between, taking care of your boat’s hull is crucial for optimal performance and longevity. One of the most pervasive and costly challenges boaters face is biofouling—when aquatic organisms like algae, barnacles, mussels, and tube worms attach themselves to your vessel’s hull and underwater gear. In this article, we will explore how biofouling impacts boat performance, discuss the most effective prevention strategies, and walk you through the solutions available to keep your hull in prime condition. 

What is Biofouling?

Biofouling, sometimes simply referred to as “fouling,” is the accumulation of living organisms on surfaces submerged in water—boats, marinas, docks, pilings, and more. These organisms vary widely:

  • Microfouling: Bacteria and microalgae (slime)
  • Macrofouling: Larger organisms such as barnacles, mussels, tube worms, and seaweed

While certain levels of fouling are common, the longer it remains on the hull, the thicker and more challenging it becomes to remove. Over time, fouling can lead to significant damage and reduced performance.

How Biofouling Impacts Your Boat’s Performance

Reduced Speed and Efficiency
Fouling adds extra drag as your boat moves through the water, slowing it down and forcing the engine to work harder. A fouled hull can reduce speed by several knots, causing a noticeable drop in efficiency.

Increased Fuel Consumption
When friction increases, so does your boat’s fuel consumption. This not only hurts your wallet at the pump, but also leads to higher emissions—bad news for both your bank account and the environment.

Damage to Hull and Propulsion Systems
Barnacles and other hard-shelled organisms can damage the paint, gelcoat, or fiberglass underneath. Over time, fouling can also impair propulsion systems like propellers and bow thrusters, prompting costly repairs.

Impact on Handling
Heavily fouled hulls make it harder to steer and maneuver, especially in tight spaces. This can become a safety hazard when docking or navigating busy waters.


Image


What You Can Do About Biofouling

Colorkote

Color Kote is an excellent antifouling coating. It incorporates self-polishing, triple biocide, low-leaching chemistry, vibrant colors, and multi-season performance.

Invest in Quality Bottom Paint (Antifouling Paint)
The first line of defense against fouling is applying the right antifouling paint. This type of coating releases biocides or repellent agents that deter organisms from latching onto your hull. At BottomPaintStore.com, we offer a comprehensive range of antifouling paints—each formulated for specific water conditions, usage patterns, and hull materials. Key factors to consider:

    • Type of water: Fresh, salt, or brackish
    • Frequency of use: Frequent cruisers might benefit from paints with strong biocides and smoother finishes.
    • Boat speed: Faster boats may need a different formulation than trawlers or sailboats that move more slowly.

Schedule Regular Hull Cleaning
Even with the best paint, a thin film of slime or algae can accumulate over time. Removing these early prevents larger organisms from taking hold. Routine diving or haul-outs to pressure wash the hull will keep fouling in check and ensure you’re running at peak efficiency.

Hammerhead Hull Cleaner works great. It uses a unique acid-surfactant blend designed to remove marine growth, hard water stains, rust, and calcium buildup.

Use Specialized Tools and Gear
If you prefer DIY approaches, consider a long-handled hull scrubber or an underwater brush. Be sure to check local regulations: some marinas prohibit in-water hull cleaning due to possible pollution from paint particles and biocides.

Inspect Props and Thrusters
Props, shafts, thrusters, and other metal components are often made from different materials than the hull, requiring specialized antifouling strategies (e.g., PropGlide type coatings). Regularly inspect these components to remove any build-up that can compromise performance or cause galvanic corrosion issues.

propglide foul release coating

PropGlide® is an excellent alternative to Propspeed. You get 25% more product per kit size for 30% less cost.

Store Your Boat Out of the Water
If feasible, keeping your boat on a lift, a trailer, or dry storage is the most surefire way to reduce fouling. Out-of-water storage deprives organisms of the aquatic environment they need to survive, drastically minimizing hull maintenance.

Choosing the Right Bottom Paint

The best antifouling paint for your boat depends on several factors, and BottomPaintStore.com can help guide you through the process:

  • Hard vs. Ablative Paint
    • Hard Paint: Ideal for high-speed boats and locations with moderate to heavy fouling. It creates a tough, long-lasting coating but does not erode.
    • Ablative Paint: Gradually wears away over time, continually exposing fresh biocide. Suitable for slower-moving vessels or those that spend extended periods at the dock.

Great protection for salt and fresh water at a very attractive price. Provides multi-season antifouling protection against barnacles, algae, and hydroids. For boat bottoms only.

Copper-Based vs. Copper-Free

    • Copper-Based: A traditional and widely used solution, effective in many fouling conditions.
    • Copper-Free: Often containing alternative biocides or water-based formulas, making them an environmentally conscious choice while still offering robust protection.


This copper free solution is designed to be the most effective environmentally friendly antifoulant available.

Biocide Level
Consider the potency and quantity of biocide in the paint. Higher levels may be more suitable in tropical waters, while moderate levels may suffice in cooler or less-fouling-prone regions.

Maintenance Tips to Maximize Results

  • Follow Manufacturer’s Instructions
    Always adhere to the paint manufacturer’s guidelines on surface preparation, application, curing times, and recommended thickness. Proper prep ensures better adhesion and maximum effectiveness.
  • Time Your Haul-Outs
    Keep track of when you first apply the antifouling paint. Knowing your paint’s typical lifespan helps you schedule maintenance well before issues arise.
  • Monitor Your Boat’s Performance
    Keep a record of engine RPM, speed, and fuel usage. A noticeable drop in speed or a spike in fuel consumption can be an early sign of fouling.
  • Don’t Neglect Above-Water Maintenance
    Though the hull below the waterline gets most of the attention, an overall well-maintained boat is less likely to develop surprises. Keep an eye on topside paint, hardware, and interior systems to ensure a smooth boating experience.

Final Thoughts

Biofouling is one of the biggest contributors to reduced boat performance and increased maintenance costs. By understanding how these marine organisms attach themselves to your hull and knowing the steps to prevent them, you can keep your boat running smoothly, save money on fuel and repairs, and enjoy a hassle-free experience out on the water.

Ready to take the next step in safeguarding your boat? Bottom Paint Store provides a wide array of antifouling paints, primers, and surface preparation products. Our team of experts is here to help you select the best solution for your vessel’s size, usage, and local water conditions. We hope your boat stays fouling-free, and you enjoy your time on the water to the fullest!


How Spar Varnish Protects and Enhances Wooden Boats

For centuries, wooden boats have captured the hearts of mariners with their timeless beauty and craftsmanship. However, these vessels face constant challenges from the harsh marine environment, including relentless UV rays, moisture, salt, and temperature fluctuations. Enter spar varnish—a trusted solution for protecting and enhancing the natural allure of wooden boats. This article delves into the science behind spar varnish, its protective qualities, and why it remains an essential choice for boat owners who prioritize both durability and aesthetics.

What is Spar Varnish?

Spar varnish is a specialized wood finish initially developed for marine applications, particularly for spars (masts, booms, and other poles) on sailing vessels. Its unique formulation combines resins, oils, and UV inhibitors to provide superior flexibility, moisture resistance, and durability.

Unlike conventional varnishes, spar varnish is designed to move with the wood, accommodating the natural expansion and contraction caused by changing temperatures and humidity levels. This adaptability is crucial for marine environments where wood faces constant stress.

The Protective Qualities of Spar Varnish

UV Resistance: A Shield Against the Sun

The sun’s UV rays are one of the most damaging forces to wooden surfaces, causing fading, cracking, and degradation over time.

  • How Spar Varnish Helps: It contains UV inhibitors that act as a sunscreen for your wood, preventing discoloration and maintaining the rich, natural tones of the grain.
  • Pro Tip: Regular maintenance, such as adding fresh coats of spar varnish, ensures continuous UV protection.

Moisture Shielding: Guarding Against Water Damage

Wood’s worst enemy in marine environments is moisture, which can lead to swelling, warping, and rot.

  • How Spar Varnish Helps: Its water-resistant properties create a barrier that repels water, preventing it from seeping into the wood fibers. This is particularly vital for wooden boats exposed to constant splashes, rain, and humidity.
  • Pro Tip: Proper preparation, including sealing end grains and applying multiple coats, maximizes moisture resistance.

Flexibility: Adapting to the Environment

Wood naturally expands and contracts with temperature and humidity changes, especially in fluctuating marine climates.

  • How Spar Varnish Helps: Its flexible formula allows it to move with the wood, reducing the risk of cracking and peeling. This ensures a longer-lasting finish even under extreme conditions.

Enhancing Wooden Boats with Spar Varnish

Beyond protection, spar varnish plays a significant role in enhancing the aesthetic appeal of wooden boats:

  • Highlighting Natural Beauty: Spar varnish brings out the depth and richness of the wood grain, giving it a warm, glossy finish that looks stunning on the water.
  • Creating a Timeless Look: Whether you’re restoring a classic vessel or maintaining a modern one, spar varnish adds a professional, polished appearance.
  • Customizable Sheen: Available in gloss, semi-gloss, or satin finishes, spar varnish allows boat owners to choose the perfect look for their craft.

Application Tips for Maximum Protection and Beauty

  1. Start with a Smooth Surface: Sand the wood thoroughly to remove old finishes and create a clean, even base for the varnish.
  2. Thin the First Coat: Dilute the first coat slightly to improve penetration into the wood fibers.
  3. Apply Multiple Coats: Build up layers (typically 6–8) for optimal protection and a deep, glossy finish.
  4. Sand Between Coats: Lightly sand between each layer to promote adhesion and remove imperfections.
  5. Protect During Curing: Ensure the varnished surface is protected from dust and moisture while it dries.

Why Spar Varnish Remains a Timeless Choice

The marine industry has seen countless innovations, but spar varnish has endured as a trusted solution for wooden boat maintenance. Its proven ability to withstand the elements, combined with its aesthetic benefits, makes it a favorite among boat owners and craftsmen alike. Whether you’re preserving a cherished heirloom or maintaining a working vessel, spar varnish delivers the perfect balance of beauty and durability.Image

Ready to Protect Your Boat?

Discover a wide selection of high-quality spar varnishes at Bottom Paint Store. From trusted brands to expert advice, we have everything you need to protect and enhance your wooden boat. Don’t let the elements take a toll—invest in spar varnish and ensure your boat remains a masterpiece on the water.


Achieving Professional-Grade Results with Polyurethane Paint

Your boat is more than just a vessel; it’s an extension of your personality and a reflection of your passion for the water. Polyurethane paint offers a unique opportunity to not only protect your boat but also to make a bold statement on the water. With its durability, versatility, and aesthetic options, polyurethane paint is the go-to choice for boat owners looking to achieve a professional-grade finish. Here’s how you can customize your boat’s finish with polyurethane paint and bring your vision to life.

Why Polyurethane Paint?

Polyurethane paint stands out for its superior durability, gloss retention, and resistance to harsh marine environments. Its high-performance qualities make it ideal for boat surfaces exposed to saltwater, UV rays, and varying temperatures. But beyond protection, polyurethane paint offers unparalleled customization options, allowing you to create a unique look tailored to your boat.

This widely used topside polyurethane enamel has tremendous resistance to tough chemicals, cleaning solutions and ultraviolet light with its advanced ultraviolet technology.

Customization Options with Polyurethane Paint

Choose Your Perfect Color Palette

Polyurethane paints are available in a wide range of colors, from vibrant blues and reds to subtle metallics and neutrals. Some manufacturers even offer custom color matching, so you can replicate a favorite shade or create a bespoke hue. Consider the following tips:

  • Stand Out or Blend In: Decide whether you want your boat to catch attention or blend seamlessly with the water.
  • Reflect Your Style: Match your boat’s color to your personal aesthetic, whether sleek and modern or bold and adventurous.
  • Practical Considerations: Opt for lighter colors to reduce heat absorption or darker shades for a striking look.

Play with Gloss Levels

Polyurethane paint allows for varying gloss levels, from high-gloss finishes that shine like glass to satin or matte finishes for a more subdued and modern appearance.

  • High-Gloss: Ideal for a premium, showroom-quality finish that emphasizes clean lines and smooth surfaces.
  • Satin/Matte: Perfect for a contemporary look, offering reduced glare and a softer aesthetic.

Experiment with Textures and Effects

Polyurethane paint is incredibly versatile, enabling you to incorporate textures and effects that set your boat apart.

  • Metallic or Pearlescent Effects: Add a touch of luxury and sophistication.
  • Non-Skid Additives: Enhance safety while maintaining a polished appearance.
  • Graphics and Designs: Use stencils or tape to create stripes, logos, or intricate designs.

Pro Tips for a Professional-Grade Finish

  1. Preparation is Key
    A flawless finish starts with proper preparation. Sand and clean the surface thoroughly, ensuring it’s free of dust, grease, and old paint. Use a high-quality primer to create a smooth base and improve adhesion.
  2. Invest in Quality Tools
    Use high-quality brushes, rollers, or spray equipment to apply the paint. Spray application is often preferred for an even, streak-free finish.
  3. Apply in Controlled Conditions
    Choose a well-ventilated space with consistent temperature and humidity levels. Avoid painting in direct sunlight or during windy conditions.
  4. Follow Manufacturer Instructions
    Polyurethane paint formulations vary, so it’s crucial to follow the manufacturer’s guidelines for mixing, application, and drying times.
  5. Seal the Deal with a Clear Coat
    For added durability and a polished look, finish with a clear polyurethane topcoat. This step enhances UV resistance and protects your design for years to come.

Maintenance Tips for Longevity

Once you’ve achieved the perfect finish, maintaining it is essential to keep your boat looking its best.

  • Wash Regularly: Use gentle, marine-safe cleaners to remove salt and grime.
  • Wax Periodically: Apply marine-grade wax to enhance gloss and protect the surface.
  • Inspect for Damage: Address chips or scratches promptly to prevent further deterioration.

Make Your Boat Unforgettable

Customizing your boat’s finish with polyurethane paint is a rewarding process that combines creativity with practicality. Whether you’re looking to make a bold statement or create a timeless look, the possibilities are endless. With the right approach and a bit of effort, you can achieve a professional-grade finish that turns heads and stands up to the elements.

Ready to bring your vision to life? Explore the wide selection of high-quality polyurethane paints at Bottom Paint Store and take the first step toward transforming your boat into a masterpiece.

Choosing the right paint store

What To Look For When Choosing the Right Paint Store

When it comes to maintaining your boat’s performance and longevity, selecting the right paint store is as critical as choosing the paint itself. Bottom paint and other marine coatings are specialized products, and finding a trusted supplier can make all the difference. In this blog, we’ll explore what to look for in a paint store and how to ensure you’re getting the best products and service for your marine needs.

Why Choosing the Right Paint Store Matters

The marine environment is harsh, and bottom paint is your boat’s first line of defense against fouling, corrosion, and wear. A reliable paint store doesn’t just sell products—it offers expertise, variety, and quality assurance, ensuring your boat gets the protection it needs.

What to Look for in a Paint Store

When searching for a paint store to meet your marine coating needs, keep the following factors in mind:

Wide Range of Products

A good paint store should carry a comprehensive selection of marine paints and coatings, including:

The availability of trusted brands ensures you have access to high-quality options that suit your boat’s specific requirements.

Expert Advice

Marine coatings are not one-size-fits-all. An excellent paint store will have knowledgeable staff who can guide you in choosing the right product based on:

  • Your boat’s material (e.g., fiberglass, wood, aluminum).
  • The type of water your boat is exposed to (saltwater or freshwater).
  • Your desired maintenance schedule.

Look for stores that offer resources like blogs, how-to guides, or even customer support to answer your technical questions.

Our expert technical support team is only a phone call away and is available Monday through Friday 9a.m. until 5p.m. to assist you with your boat painting project.

Eco-Friendly Options

Sustainability is increasingly important in boating. A paint store that offers eco-friendly or low-VOC options demonstrates a commitment to reducing environmental impact without compromising performance.

Competitive Pricing

Whether you’re a weekend sailor or a professional mariner, cost matters. A reliable paint store should provide competitive pricing, seasonal promotions, or bulk discounts for frequent buyers.

Convenience and Accessibility

A store’s location or online presence can make a big difference. Check for:

  • Easy online ordering and delivery options.
  • Detailed product descriptions and usage instructions on their website.
  • Stores that offer fast shipping to keep your project on schedule.

Why Bottom Paint Store Stands Out

At Bottom Paint Store, we pride ourselves on being your go-to resource for marine coatings and bottom paint. Here’s why boaters choose us:

  • Comprehensive Product Range: We carry top brands of bottom paint, primers, topcoats, and more, all designed to perform in demanding marine environments.
  • Expert Support: Our team is available to help you choose the right products, whether you’re maintaining a small sailboat or a large commercial vessel.
  • Eco-Friendly Choices: Explore our line of environmentally friendly bottom paints that balance performance with sustainability.
  • Convenience: With a user-friendly website and fast shipping options, we make it easy to get the products you need, delivered straight to your door.

Final Thoughts

Selecting the right paint store isn’t just about convenience—it’s about ensuring your boat gets the best protection and performance on the water. By choosing a store with a wide product range, expert guidance, and customer-focused services, you’re setting your boat up for success.

Ready to find the perfect paint for your boat? Visit Bottom Paint Store  or call 888-505-2313 today and explore our extensive range of marine coatings. Whether you’re tackling a DIY project or managing a fleet, we’ve got everything you need to get the job done right!

Seasonal Boat Paint Maintenance Checklist

As a boat owner, maintaining your vessel’s paintwork is essential for keeping it seaworthy, visually appealing, and protected against harsh marine environments. Do it right, and your paint will last longer, prevent costly repairs, and ensure smooth sailing year-round. So, grab your tools, your grit, and maybe a cold beverage—here’s your seasonal boat paint maintenance checklist. Let’s get to work.

Fall: Preparing for Storage

As boating season winds down, fall maintenance prepares your boat for winter storage.

  1. Thorough Cleaning
    • Remove any marine growth and thoroughly wash the hull and deck.
    • Dry the boat completely to prevent mold or mildew.
  2. Inspect and Repair
    • Check for new scratches or damage that occurred during the summer.
    • Apply touch-up paint and seal any exposed areas.
  3. Winterize Bottom Paint
    • If your boat will remain in the water, ensure antifouling paint is intact to protect against marine growth.
    • For stored boats, consider a protective cover to shield the paint.
  4. Remove Hardware
    • Remove accessories and hardware to prevent rust stains on painted surfaces during storage.

Winter: Off-Season Maintenance

Winter is an excellent time for major maintenance projects, including repainting.

  1. Plan Repainting Projects
    • Strip old paint if it’s heavily worn or damaged.
    • Choose high-quality marine paint suitable for your boat’s needs.
  2. Inspect Below Waterline
    • Check the keel, rudder, and other underwater areas for damage or wear.
    • Address any issues during the off-season.
  3. Schedule Professional Services
    • If repainting isn’t a DIY task for you, schedule professional services early to avoid spring delays.

Spring: Preparing for Launch

Spring marks the beginning of the boating season, making it the perfect time to inspect and touch up your boat’s paint.

  1. Inspect for Damage
    • Check for peeling, blistering, or flaking paint.
    • Look for any signs of rust or corrosion, especially on metal components.
  2. Wash and Remove Debris
    • Use a marine-grade cleaner to remove dirt, grime, and winter residue.
    • Pay special attention to areas prone to algae and barnacle buildup.
  3. Touch-Up Paintwork
    • Sand and repair small scratches or chips in the paint.
    • Apply primer and touch-up paint as needed.
  4. Reapply Bottom Paint (if needed)
    • If your boat’s antifouling paint is thinning or worn, spring is the ideal time for a fresh coat.
    • Choose the appropriate paint based on your boat’s location and water type (e.g., freshwater or saltwater).


Image


Summer: Mid-Season Check

With your boat in regular use, summer maintenance ensures its paint stays in top condition.

  1. Perform Regular Cleaning
    • Rinse your boat with fresh water after every trip to remove salt and prevent buildup.
    • Use a soft brush and marine soap for gentle cleaning.
  2. Inspect for Wear and Tear
    • Check high-traffic areas for scuffs or fading.
    • Address minor issues promptly to prevent further damage.
  3. Wax and Polish
    • Apply a UV-protective wax to prevent sun damage and fading on topside paint.
  4. Monitor Bottom Paint Performance
    • Look for signs of fouling like algae or barnacles and clean as needed.

General Tips for Boat Paint Maintenance

  • Always use marine-specific paints and cleaning products.
  • Follow manufacturer recommendations for paint application and maintenance.
  • Keep a maintenance log to track repairs, paint applications, and inspections.

Maintaining your boat’s paint might seem like a chore, however with this seasonal checklist, you’ll ensure your vessel remains in peak condition year-round and ready for that next trip on the water. Need supplies for your boat’s paint maintenance? Visit Bottom Paint Store for premium antifouling paints, primers, cleaning products, and expert advice.

Do-It-Yourself vs. Professional Bottom Painting: Which Option Is Best for You?

Whether you’re a seasoned sailor or a weekend warrior, keeping your boat’s hull in shipshape condition is essential. But should you grab a paintbrush and do it yourself, or leave it to the pros? Let’s dive into the pros and cons of each approach to help you decide the best route to smooth sailing.

Option 1: DIY Bottom Painting

The do-it-yourself (DIY) route has one big advantage: it’s easier on your wallet. Professional services can be pricey, so if you don’t mind getting a little paint on your hands (and maybe in your hair), DIY bottom painting might be the way to go. Here are the main things to consider:

Pros of DIY

  • Cost Savings: The cost of professional bottom painting can make a boat owner clutch their wallet. By doing it yourself, you’re paying only for materials—not labor. This is ideal if you’re on a budget or just enjoy saving money.
  • Flexible Timing: With DIY, you’re on your own schedule. No waiting for an appointment; you can just grab your supplies and get to work.
  • Satisfaction: Nothing beats the sense of accomplishment that comes from a job well done. Plus, you can brag about it to your fellow boaters.

Cons of DIY

  • Time-Consuming: Bottom painting is no quick Saturday afternoon project. You’ll need to prep, sand, prime, and apply multiple coats. Plan for several hours (or days) of hard work.
  • Skill Required: Applying bottom paint isn’t as simple as painting your fence. If you don’t follow the steps properly, you could end up with a patchy finish that’s less than effective at keeping marine growth at bay.
  • Potential for Mess: Paint splatters happen. And antifouling paint is notoriously sticky and difficult to clean up, so prepare to sacrifice a pair of pants to the cause.

DIY Checklist

If you’re going the DIY route, here’s a quick checklist for success:

  1. Choose the Right Paint: Ensure you have the right type for your boat’s material and the waters you frequent.
  2. Prep the Surface: Sand and clean the hull meticulously. Any dust or dirt can mess with the paint’s adhesion.
  3. Apply Even Coats: Don’t rush. Multiple thin layers work better than one thick, drippy coat.
  4. Give It Time to Cure: Don’t splash in right away; let it dry fully.
Colorkote

The next-generation hull coating built with Sea Hawk DNA. Incorporating self-polishing, triple biocide, low-leaching chemistry, vibrant colors, and multi-season performance.

Option 2: Professional Bottom Painting

If DIY sounds like a nightmare or if you’d rather spend your time elsewhere, then hiring a professional service might be your best bet. But let’s weigh it out:

Pros of Hiring a Pro

  • Professional Results: Pros know the ins and outs of hull prep and paint application. They can achieve a smoother, more even finish, which means better protection for your hull.
  • Time-Saving: Instead of spending a weekend covered in paint, you can be out enjoying life (or watching others paint boats).
  • Warranty or Guarantee: Many professionals offer a warranty on their work, giving you peace of mind that the job is done right.

Cons of Hiring a Pro

  • Higher Cost: Quality comes at a price. Expect to pay significantly more for a professional job than a DIY project.
  • Scheduling Issues: Boat yards can be busy, especially as the boating season winds down. You might need to book well in advance.
  • Limited Control: You’re handing off control of the process, so if you’re the type who likes things “just so,” this could be tough.

Tips for Choosing a Reputable Pro

  1. Read Reviews: See what other boaters have to say about the professional.
  2. Ask About Experience: A seasoned painter will know the specific needs of your boat.
  3. Get a Clear Estimate: Make sure you know exactly what’s included in the cost.

To conclude

Whether you’re up for the challenge of a DIY or would rather let the pros handle it, bottom painting is essential for keeping your boat in prime condition. DIY saves money and provides that “I did this” satisfaction, but it requires time, effort, and some skill. Hiring a pro gets you a guaranteed, high-quality result. Ultimately, it’s about your budget, patience level, and how much you enjoy a good DIY project.

So grab that brush or call your local expert and get ready for next season! And hey, maybe take a before-and-after picture—you’ll want proof of that gleaming hull, no matter how it got that way.


Preparing Your Boat for Storage: Bottom Paint Tips to Keep Your Hull Ready for Next Season

As the end of boating season approaches, it’s time to say goodbye to those sunny days on the water and start thinking about where your boat will hibernate for the winter. Preparing your vessel for storage can seem like a chore, but with a few handy tips—especially when it comes to bottom paint—you can help ensure a smooth transition back to the water next season. Plus, your boat will thank you for giving it a little love before its long winter’s nap!

Step 1: Clean Like You Mean It

Imagine coming out of a long winter nap only to find your face covered in mud and algae. That’s how your boat feels right now! A clean hull is a happy hull, so start by giving it a thorough wash to remove any remaining gunk, barnacles, or algae. Skip this step, and you’ll have a mini-reef growing under there by spring.

Once you’ve scrubbed away the season’s grime, it’s time for a quick inspection. Check for scratches, chips, or damage that might need repairs before applying any fresh paint. Remember, like any good friend, your hull needs you to notice the little things—even those pesky scratches that seem to appear out of nowhere.

Step 2: Choosing the Right Bottom Paint

When it comes to boat bottom paint, it’s not a one-size-fits-all situation. Different types of paint serve different purposes, so pick one that best matches your boat’s needs and how often you use it. If your boat is planning on a career as a freshwater weekend warrior, a basic antifouling paint should do the trick. For saltwater sailors or frequent floaters, you might need a heavy-duty copper-based paint to keep those critters at bay.

Developed as an alternative to tin-based antifouling paints to protect against the harshest marine environments. Using the newest biocide technology, a revolutionary polymer binder system produces an engineered biocide release that leaves no harmful effects on the environment.

For boaters who pride themselves on being eco-friendly (or just don’t want to turn their hull into a toxic waste site), there are environmentally friendly bottom paints, too. These help prevent growth without releasing as many harmful chemicals. Your boat and the fish will thank you!

Step 3: Apply with Care

Before you start slapping paint on like a Jackson Pollock, keep in mind that proper application is key. Apply the bottom paint according to the manufacturer’s recommendations (even if you’re tempted to cut corners). Use the right type of roller, or if you’re feeling fancy, a sprayer. Just try not to get paint everywhere—especially on yourself. While a “marine blue” hue is trendy on your hull, it’s less appealing on your jeans.

Step 4: A Final Check Before Storage

Once the paint’s applied and dry, do one last walk-around. Check that all hardware is secure, and make sure your boat is well-supported on blocks or stands. Storing your boat improperly can lead to hull damage, and no one wants to kick off next season with a repair bill.

Step 5: Dream of Next Season

Congratulations! Your boat is now ready to rest and recharge for next year’s adventures. So, tuck it in, wish it goodnight, and start dreaming of next season’s adventures. By following these tips, you’re ensuring a quicker, easier start when it’s time to hit the water again.

Remember, preparation now means less hassle later—because who wants to spend the first boating weekend of the season scraping barnacles? Now that you’ve shown your boat some TLC, it’ll be ready to get back out there with you when the new boating season returns.

Innovative Techniques for Customizing Boat Colors

Customizing the color of your boat is an exciting way to make it stand out on the water. With advances in DIY techniques and materials, achieving a professional-quality look is within reach for boat enthusiasts. Whether you’re looking for a sleek modern finish or a vibrant and bold design, here are some innovative DIY methods to help you customize your boat’s colors.

Prepping the Boat Surface: The Foundation for Success

Before diving into the creative aspects, proper surface preparation is crucial. Begin by cleaning the hull and removing any old paint, wax, or grime that could interfere with the new finish. Sanding down the surface ensures that your new paint or coating adheres smoothly. After sanding, wipe the area with a solvent such as acetone to eliminate dust and particles.

Choosing the Right Paint: Polyurethane and Gelcoat Options

One of the most effective DIY techniques for custom boat colors involves using polyurethane or gelcoat paints. Polyurethane paints are durable, resistant to UV rays, and come in a wide range of vibrant colors, making them a popular choice for those looking for a glossy, professional finish. Gelcoat, on the other hand, offers excellent protection and is ideal for fiberglass boats, creating a long-lasting, glossy surface that holds color well.

liquid urethan kits

  Poly-U-Foam is a 2 part polyurethane foam that provides excellent flotation, soundproofing or insulation.

If you’re aiming for a high-gloss finish with deep, rich colors, polyurethane is the way to go. This paint can be applied using a spray gun for an even, flawless look, but it’s important to apply multiple thin layers, allowing each coat to cure fully before applying the next.


Gelcoat Repair Putty is the BEST choice if you’re in need of a fiberglass gelcoat repair kit! If you are wondering how to repair fiberglass or gelcoat on a boat then this Gelcoat Putty is the ONLY product you’ll need to use, and the easiest way to fix it!

Tape Off & Stencil for Unique Patterns

To create unique designs or patterns, using painter’s tape and stencils can elevate your boat’s color customization. After applying the base color, use painter’s tape to outline stripes, shapes, or even intricate designs. You can also purchase stencils or make your own to add logos, images, or detailed patterns to your boat’s hull.

This technique works especially well for those who want to incorporate multiple colors into the design. Start by applying the lightest color first, then use stencils or tape to mask areas before applying additional colors. After the paint dries, carefully peel off the tape to reveal crisp, sharp edges.

Airbrushing: A Technique for the Creative Boater

For more intricate and custom designs, airbrushing offers an artistic flair. Airbrush kits allow you to blend colors and create gradient effects, adding depth and texture to your boat’s finish. This technique is perfect for creating custom logos, images, or even marine life designs that can make your boat a one-of-a-kind work of art.

When using an airbrush, it’s essential to practice on scrap material first to get a feel for how the paint sprays and to perfect your design. Thin layers and multiple passes with the airbrush will help prevent dripping and ensure smooth transitions between colors.

Vinyl Wrapping: The Quick & Removable Solution

If painting feels too permanent or time-consuming, consider vinyl wrapping as an innovative and easily customizable option. Vinyl wraps come in endless color options and finishes, from matte to glossy, metallic, or even textured surfaces like carbon fiber. The best part about vinyl wrapping is that it’s fully reversible—you can change your boat’s appearance as often as you like without committing to a permanent paint job.

Applying vinyl wrap yourself requires patience and attention to detail. Begin by measuring your boat to ensure you purchase enough vinyl, and carefully apply the wrap using a heat gun and squeegee to smooth out any bubbles or wrinkles.

Metallic Flake for a Dazzling Effect

Adding metallic flake to your boat’s paint job is an innovative way to give it a shimmering, dazzling appearance on the water. You can mix metallic flake into a clear coat or specialized paint, which is then applied over the base color. This technique is particularly popular for those who want their boat to catch the light and shine with a reflective, almost glittery effect.

When working with metallic flake, be sure to use fine particles and apply in thin layers. Too much flake at once can create an uneven texture, so build up the shine gradually for a smooth, professional look.

Glow-in-the-Dark Paint: Stand Out at Night

For boaters who want their vessel to shine day and night, glow-in-the-dark paint is a fun and innovative technique. This type of paint absorbs sunlight during the day and glows after dark, making your boat visible in low light conditions or after sunset. Available in various colors, glow-in-the-dark paints can be applied as accents or incorporated into larger designs for a unique nighttime effect.


Finishing Touches: Sealing Your Work

Once your custom design is complete, sealing the paint job is essential to protect your hard work from the elements. Applying a UV-resistant clear coat not only enhances the shine of your boat’s new color but also protects it from fading and damage caused by sun exposure. For extra protection, some DIYers opt for a ceramic coating, which provides a durable, glossy finish that repels water and dirt, keeping your boat looking pristine for longer.

Final Thoughts

Customizing your boat’s color doesn’t have to be an overwhelming project. With the right tools, materials, and a little creativity, you can achieve a stunning and personalized look that will make your boat stand out on the water. Whether you go for bold patterns, intricate airbrushed designs, or a simple color change, these innovative DIY techniques make it possible to create a finish that reflects your unique style.

How to Epoxy Resin a Bar Top: A Guide to Turning Your Bar Top into a Showstopper

How to Epoxy Resin a Bar Top: A Guide to Turning Your Bar Top into a Showstopper

Whether you’re a DIY enthusiast or just someone who refuses to pay for something you could probably do yourself, coating a bar top in epoxy resin is one of the most rewarding home projects out there. With the right steps and a little patience, you’ll transform your bar from “functional” to “wow, is this granite?!” (No, but it’ll look that good). Let’s walk you through it—from prepping the surface to pouring that final glossy layer.

Step 1: Gather Your Supplies

Before we dive into the resin (not literally, though that would make for a great YouTube video), let’s talk supplies. Here’s what you’ll need for this sticky yet satisfying adventure:


epoxy resin kit

Bar top epoxy resin is a popular choice for creating clear, hard, and durable surfaces, often found on commercial bar tops and restaurant tables.

Epoxy resin: Make sure you get a good quality, clear epoxy resin designed for countertops or bar tops.

Measuring cups: You’ll need these to mix the resin and hardener in the correct ratios.

A stir stick: For mixing. We’ll explain more on the mixing process in a bit (hint: it involves a lot of stirring).

Painter’s tape: You’ll use this to create barriers around the edges of the bar, so the epoxy doesn’t dribble off like syrup on a pancake.

Sandpaper: For smoothing out any imperfections in the bar top surface before applying the epoxy.

Gloves and protective gear: Epoxy resin doesn’t come out of clothes easily, and your hands will thank you later.

A heat gun or propane torch: This will be used to remove air bubbles from the epoxy surface once it’s poured.

Drop cloths: Things will get messy. Trust me, you’ll want these.

Now that you’ve got your arsenal ready, let’s prepare that bar top!

Step 2: Prep the Surface Like a Pro

The key to a smooth, beautiful bar top lies in the prep work. Epoxy resin will show every little flaw, so it’s crucial to start with a clean, smooth surface. If you’re working with an older bar or a wooden surface, you’ll want to sand it down using fine-grit sandpaper (220 grit works well). This removes any old finishes, stains, or rough patches. Give it a wipe with a damp cloth to remove all the dust afterward.

Pro tip: Use painter’s tape to cover any areas where you don’t want the resin to go. Also, make sure your bar top is perfectly level—epoxy resin is a bit of a diva and will flow downhill if given the chance.

Step 3: Mix It Up

Now comes the moment of truth—mixing the epoxy resin. Most resins come with a two-part system: resin and hardener. These need to be mixed in the exact ratios specified by the manufacturer, usually 1:1 or 2:1.

Step-by-step mixing instructions:

Pour the resin into one measuring cup.

Pour the hardener into another.

Combine them in a larger container and stir like you’ve never stirred before. Keep mixing for at least 3-5 minutes to ensure they’re fully combined. Don’t rush this step; if the resin isn’t mixed properly, it won’t cure correctly, and you’ll be stuck with a sticky mess.

Pro tip: Scrape the sides and bottom of the container as you stir to avoid any unmixed resin or hardener clumps.

Step 4: The Pour

This is where things get exciting (and potentially very sticky). Once your resin is fully mixed, it’s time to pour it over the bar top. Start by pouring in the center and allow the resin to spread outward. Use a foam brush or plastic spreader to help guide it evenly across the surface.

Don’t worry too much if it looks a bit uneven at first; the resin will self-level over time. Your main job is to make sure it covers every square inch of the bar top.

Step 5: Banish Those Bubbles

One thing about epoxy resin: it loves bubbles, but we don’t. After pouring, you’ll notice tiny bubbles rising to the surface. This is where your heat gun or propane torch comes into play. Pass it gently over the surface, just a few inches above, and watch as the bubbles disappear like magic. Be careful not to linger too long in one spot, though—you’re trying to pop bubbles, not cook dinner.

Step 6: Let It Cure

Now comes the hardest part: waiting. Depending on the type of epoxy resin you’re using, curing time can take anywhere from 24 to 72 hours. During this period, keep the bar top covered to prevent dust, bugs, or curious pets from getting into the wet resin.

Step 7: Apply Additional Coats (If Necessary)

Once the first coat has cured, you may want to apply additional layers for added depth and durability. If you’re satisfied with the first coat, congratulations! You’re done! If you want that extra-thick, glass-like finish, repeat the mixing and pouring process until you’ve achieved your desired thickness.

Step 8: Enjoy Your Handiwork!

As your friends admire your new, super-glossy bar top pat yourself on the back, pour yourself a cold one, and bask in the glory of a job well done. Not only have you saved a ton of money by doing it yourself, but you’ve also added a touch of craftsmanship that’s guaranteed to impress anyone who visits.

Ready to Protect Your Bar Top?

Now that you know the ropes, it’s time to get started and create that high-gloss magazine look or at least keep your surface spill-proof. If you need any assistance selecting a good bar top epoxy resin you can always call the Bottom Paint Store customer support team 888-505-2313.

The Environmental Benefits of Using Low-VOC Marine Coatings

The marine industry plays a critical role in global transportation, recreation, and industry; it also faces increasing pressure to adopt more environmentally responsible practices. One significant way boaters can contribute to sustainability is through the use of low-VOC (Volatile Organic Compounds) marine coatings. Traditional marine paints and coatings release harmful VOCs into the atmosphere, contributing to air pollution and posing health risks to marine life and humans alike. In this blog post will discuss how low-VOC alternatives can offer an effective solution with numerous environmental benefits.

One of the primary advantages of low-VOC marine coatings is their reduced impact on air quality. VOCs are chemicals that easily evaporate at room temperature, releasing pollutants into the air. These compounds contribute to the formation of ground-level ozone, a key component of smog, which can harm both marine ecosystems and human respiratory health. By choosing low-VOC coatings, shipyards and boat owners help minimize the release of harmful emissions, improving air quality in coastal areas and reducing the global environmental footprint of the marine industry.

Another significant benefit is the reduction of hazardous waste. Traditional marine coatings often contain high levels of toxic substances that can contaminate water and soil if not disposed of properly. These toxins can leach into the ocean, affecting marine organisms and disrupting ecosystems. Low-VOC coatings are formulated with fewer hazardous chemicals, which means less toxic waste is generated during the application and cleanup processes. This helps protect the marine environment from long-term damage and promotes a healthier aquatic ecosystem.

The Same Legendary Performance as the Original Cukote with Reduced VOCs.

Low-VOC marine coatings also contribute to energy efficiency. Many low-VOC products are designed to be more durable and resistant to the harsh conditions of the marine environment, including saltwater, UV radiation, and temperature fluctuations. This increased durability means that boats and ships require less frequent repainting and maintenance, reducing the amount of energy and resources needed for upkeep. By extending the lifespan of coatings, low-VOC solutions help decrease the overall environmental impact of marine maintenance activities.

In addition to these direct environmental benefits, the adoption of low-VOC marine coatings aligns with growing global regulations aimed at reducing VOC emissions. Many countries are implementing stricter guidelines for industries that emit VOCs, including the marine sector. By using low-VOC coatings, businesses can stay ahead of regulatory requirements, avoiding potential fines or penalties while demonstrating a commitment to sustainability.


Tuff Stuff Low VOC Epoxy Primer complies with rigid VOC limits set by the California Air Quality Management Board and offers a Low VOC alternative when applying water barrier or corrosion protection.

The shift towards low-VOC marine coatings is not only a step toward reducing environmental harm but also an opportunity for the marine industry to lead by example. By prioritizing eco-friendly alternatives, marine professionals can contribute to cleaner air, healthier oceans, and a more sustainable future for the planet.

How to Extend the Lifespan of Antifouling Paint in Extreme Marine Conditions

Hey boat fans, in this blog post we’re going to discuss antifouling paint, which is much more than a paint; it’s a shield, protecting your boat from the relentless buildup of marine life—barnacles, algae, you name it. But here’s the kicker: when you’re out there, facing the unforgiving elements—blazing UV rays, the corrosive power of saltwater, and relentless biofouling—that paint is going to wear down quicker than you’d like.

So, what do you do? How do you make sure you’re getting the most out of your antifouling paint, especially in extreme conditions? Well, we’re going to share a few expert tips to help you extend the lifespan of your paint and keep your vessel protected.

Choose the Right Type of Antifouling Paint

There are several types of antifouling paints available, each designed to meet different marine conditions. For extreme environments, it’s important to choose a paint that offers both durability and high-performance biofouling protection.

  • Hard (Modified Epoxy) Paints: These paints create a tough, abrasion-resistant surface, making them ideal for vessels that face aggressive marine environments or require frequent cleanings. However, they release fewer biocides over time.


  • Ablative (Self-Polishing) Paints: Ablative antifouling paints wear down gradually, constantly exposing fresh layers of biocides, which can extend protection. These are especially good for boats in high-fouling areas, as they help prevent thick buildups over time.

Sea Hawk Cukote bottom paint is an ablative, self-polishing antifouling paint that uses an enhanced, copolymer, biocide release mechanism.

  • Hybrid Antifouling Paints: Combining features from both hard and ablative paints, hybrid options can offer a balance of durability and consistent performance, suitable for extreme marine conditions.


Biocop TF

Biocop TF was developed as an alternative to tin-based antifouling paints to protect against the harshest marine environments.

Surface Preparation is Key

Proper surface preparation is critical to the performance and longevity of antifouling paint. Follow these steps to ensure a strong bond between the paint and the hull:

  • Clean the Hull: Before applying antifouling paint, make sure the hull is thoroughly cleaned of any old paint, dirt, or residue. Pressure washing or sandblasting can help remove tough contaminants.
  • Sand the Surface: Lightly sanding the surface will improve adhesion, helping the new coat of antifouling paint stick better. Always follow the manufacturer’s instructions for grit size.
  • Apply a Primer: Using a marine primer specifically designed for antifouling paint will enhance the paint’s bond with the hull, preventing peeling or flaking over time.


Aquagard® 181 Solvent Based Primer is a single component solvent-based primer designed to promote adhesion of bottom paints on fiberglass, wooden and aluminum boat hulls.


Follow Proper Application Techniques

Applying antifouling paint incorrectly can significantly reduce its lifespan, especially in extreme conditions. Here are some best practices to ensure a strong, long-lasting coat:

  • Apply the Correct Thickness: Follow the manufacturer’s recommendations for the number of coats and ensure you apply each one evenly. Too thin of a layer may not provide adequate protection, while too thick could lead to cracking.


  • Pay Attention to Drying Times: Extreme marine conditions often involve high humidity or strong sunlight, which can affect how the paint dries. Make sure to follow the drying times specified by the manufacturer based on your local climate conditions.


  • Focus on High-Wear Areas: Pay extra attention to areas of the boat that experience the most wear and tear, such as the bow, waterline, and rudder. Consider applying additional coats to these areas for extra protection.


4. Regularly Clean and Inspect the Hull

Even with antifouling paint, your boat will still accumulate some growth in extreme marine environments. Regularly cleaning the hull can help prevent excessive biofouling, which can shorten the paint’s lifespan.

  • Use Soft Brushes: Hard scrubbing can wear down antifouling paint, especially ablative types, so opt for a soft brush to remove buildup without stripping away the protective layers.


  • Schedule Regular Inspections: Periodically haul out your boat to inspect the hull. Check for any signs of wear, peeling, or excessive fouling. Catching and addressing issues early will help extend the overall life of your antifouling paint.


5. Apply a Fresh Coat at the Right Time

When exposed to harsh marine environments, even the best antifouling paint will eventually wear down. To maximize your protection, be proactive in reapplying paint before it becomes too thin to be effective. Timing varies based on the type of paint used and the conditions, but generally, applying a fresh coat every 12-24 months is recommended for vessels in extreme environments.

6. Consider Environmental Factors

Extreme marine conditions involve more than just water—it also includes UV radiation, salinity, and temperature fluctuations. These factors can degrade antifouling paint faster, so consider these points:

  • Use UV-Resistant Paints: Some antifouling paints are formulated with UV blockers to resist the breakdown of the paint’s protective chemicals under harsh sunlight.


  • Monitor Water Salinity: Higher salt content in the water can accelerate corrosion, so use a paint designed to withstand these conditions.


Here’s the takeaway: if you want to protect your boat in tough marine conditions, it all comes down to choosing the right antifouling paint and committing to proper application and maintenance. It’s not rocket science, but it does take care. Pick the right paint, prep the hull properly, apply it evenly, and keep up with regular maintenance—that’s how you extend the life of your paint and keep your boat running smoothly.

Need more information or the right products? Head over to Bottom Paint Store. We’ve got everything you need including free technical support so you can keep your boat protected, no matter what the seas throw your way. Stay informed, stay prepared!

Preparing Your Boat’s Paint for Winter

If you live in one of the northern states of the U.S. your boating season will come to a close eventually, and that means getting your boat ready for winter. If you want your boat to stay in good shape, you’ve got some work ahead. Don’t worry, we’ve compiled a solid checklist to keep your boat’s paint intact through the cold months, so when you’re ready to hit the water next season, so is your boat. Let’s get to it and make sure your paint job survives the winter chill!

Clean the Hull Thoroughly

Before storing your boat, remove any dirt, algae, or barnacles from the hull. A clean surface ensures that any existing antifouling paint remains effective and that you can inspect for damage more easily. Use a pressure washer or soft brush with mild cleaners suitable for your paint type.

Inspect for Paint Damage

Once clean, inspect the hull for any signs of paint wear or damage. Look for cracks, chips, or peeling areas, especially along the waterline. If you notice severe wear, mark these areas for touch-up or repainting when temperatures are suitable.


Repair Minor Paint Damage

If you spot minor chips or scratches, use touch-up paint to fix them. Pettit Paint offers small-scale repair solutions, such as their topcoat and primer products, which are ideal for such jobs. Ensure you follow manufacturer instructions for temperature and humidity during application.

Apply a New Coat if Necessary

If your boat’s antifouling paint has seen better days, consider applying a fresh coat before winter. Pettit’s water-based antifouling paints offer excellent protection and can be applied in cooler temperatures. Make sure to check the weather conditions and follow the specific drying times.

Use a Primer for Extra Protection

For boats that will be stored on trailers or cradles, applying a protective primer like Pettit’s Protect High Build Epoxy Primer can prevent moisture from penetrating the hull and causing blisters. This layer adds an extra barrier against winter’s harsh conditions.

Winterize the Hull

For boats stored in water, consider applying a protective wax or non-stick coating to prevent marine growth from attaching during the offseason. Pettit’s specialty products, like Prop Coat Barnacle Barrier, are perfect for safeguarding your boat’s underside.

Check Weather Exposure

If your boat is stored outside, ensure it is properly covered and sheltered from the elements. Direct exposure to snow, ice, and freezing rain can damage the paint. A good-quality cover, combined with proper ventilation, will help maintain your boat’s finish during winter.

Spring Inspection

Before launching your boat in the spring, inspect the hull again to ensure the paint held up over the winter. Touch up any areas that may have been compromised and perform a light cleaning to remove dust or debris.

Your boat is a prized asset, so you need to protect your boat’s paint from winter damage and ensure it’s ready for the next boating season. Regular maintenance is key to extending the life of both your boat and its paint. Regular maintenance isn’t just smart—it’s essential if you want your boat looking good and running smooth year after year. Need more tips or the best marine paints to get the job done? You can count on our expert advice and high-quality marine paints, just contact the customer support team at Bottom Paint Store. 

Choosing and Using Marine Paint Strippers for Safe and Effective Application

Marine paint strippers are essential for removing old, damaged, or unwanted paint from boats and marine structures. They help maintain the vessel’s integrity and appearance, ensuring a smooth surface for new paint and protecting against further wear. Choosing the right paint stripper is crucial for achieving effective results while ensuring safety and compatibility with the surface.

Types of Marine Paint Strippers

Marine paint strippers come in various formulations. Solvent-based strippers are powerful and effective for tackling multiple layers of paint, particularly on metal surfaces, though they can be harsh and require careful handling. Gel-based strippers have a thicker consistency, making them suitable for vertical surfaces and detailed areas. They stay in place longer, allowing for more controlled application. For those concerned about environmental impact, eco-friendly options are available. These strippers use less aggressive chemicals and are designed to be safer for marine life and ecosystems. Sea Hawk Marine Paint Stripper is a notable example, providing a balance between effectiveness and user safety.

Key Considerations for Choosing the Right Marine Paint Stripper

When selecting a marine paint stripper, several factors should be considered. Surface compatibility is essential, as different strippers are suited for metal, fiberglass, or wood surfaces. Safety is also a significant concern; opting for environmentally friendly products can minimize health risks. Effectiveness is important, so choose a stripper proven to work on marine-grade paints. Additionally, ease of application and clean-up should be considered, as some products require specialized tools or techniques. The drying or setting time of the stripper is another factor, as different products have varying timelines for effectiveness.

Step-by-Step Guide to Safely Apply Marine Paint Strippers

Begin by preparing the surface, ensuring it is clean and dry before applying the stripper. Gather the necessary tools, including brushes, scrapers, and safety gear like gloves, goggles, and masks. Apply the stripper evenly across the surface using a brush, following the manufacturer’s instructions for optimal results. Allow the stripper to work as directed, typically waiting until the paint begins to bubble or lift. Once the paint is softened, gently scrape it off, taking care to avoid aggressive scraping that could damage the underlying surface.

Safety Precautions When Using Marine Paint Strippers

Safety is paramount when using marine paint strippers. Always wear protective gear, including gloves, goggles, and masks, to shield yourself from harmful fumes and chemicals. Work in a well-ventilated area or outdoors to avoid inhaling toxic fumes. Proper disposal of paint and stripper residue should follow local regulations to minimize environmental impact.

Eco-Friendly and Biodegradable Options

For those who prioritize environmental considerations, eco-friendly marine paint strippers are available. These products comply with environmental regulations and are designed to be less harmful to marine ecosystems. Look for biodegradable options that help reduce the ecological footprint of your maintenance projects.

This environmentally safe formula is biodegradable, non-flammable, low odor, and has no methylene chloride or other harsh solvents.

Common Mistakes to Avoid When Using Marine Paint Strippers

Several common errors can impact the effectiveness of paint strippers. Using too much or too little product can lead to wasted materials or inadequate paint removal. Scraping too aggressively can damage the surface, so gentle scraping is recommended. Always follow the manufacturer’s instructions to avoid problems and ensure the best results.

Maintenance Tips After Stripping Paint

After removing old paint, it is important to prepare the surface for new paint by thoroughly cleaning it to remove any residue. Ensure the surface is completely dry before applying new paint. Properly store tools and maintain them for future use to ensure they remain in good condition.

How to Choose and Apply Non-Skid Boat Deck Paint for Safety and Durability

Why Non-Skid Deck Paint is Essential

Safety on boats is crucial, particularly on decks where water can create a slipping hazard. Whether for recreational purposes or professional boating, non-skid surfaces are essential to prevent accidents and ensure stability. Non-skid deck paint offers a practical solution that enhances traction and improves the overall appearance of the boat, making it a popular choice among boat owners.

Types of Non-Skid Deck Paint

One option is textured paint, which incorporates non-slip additives like silica, polymer beads, or rubber to create a rough surface that improves grip. Textured paints are commonly used in areas exposed to water, providing excellent traction. Another type is pre-mixed non-skid paint, which is convenient and easy to use, making it ideal for DIY enthusiasts. These paints come ready to apply with the non-slip additives already mixed in, ensuring consistency in texture. Some prefer additive-based non-skid solutions, which allow users to mix non-skid additives such as sand, silica, or specialized granules into regular marine paint. This offers the flexibility to customize the texture and non-slip performance based on individual needs.

Non-Skid is a pumice additive that can be added to most paints and gel coats to provide a slip resistant surface. Learn more.


Key Factors to Consider When Choosing Non-Skid Deck Paint

Durability is one of the primary considerations when selecting non-skid paint. The paint should be able to withstand marine conditions such as saltwater exposure, UV rays, and heavy foot traffic. Choosing a durable paint ensures that the non-skid properties remain intact over time. Ease of application is another important factor, particularly for those who plan to apply the paint themselves. Pre-mixed options simplify the process, while additive-based solutions offer more customization but require additional effort to prepare. Aesthetic preferences should also be taken into account.

Non-skid deck paints come in a variety of colors and finishes, giving boaters the ability to match their deck to the overall look of the vessel, whether they prefer a sleek, modern design or something more traditional. Additionally, it is essential to ensure the paint provides waterproofing to prevent water damage and includes UV protection to maintain the paint’s integrity under prolonged sun exposure. Both of these features contribute to the longevity of the paint.

Griptex is a polymer bead aggregate used to provide non skid deck and step areas when mixed with an Awlgrip topcoat. Learn more.

Step-by-Step Guide to Applying Non-Skid Deck Paint

The first step is preparation. Start by thoroughly cleaning the deck to remove any dirt, grease, or old paint that could interfere with the adhesion of the new paint. Once clean, sand the surface to create an even texture that allows the paint to bond properly. After sanding, wipe down the deck with a solvent to remove any remaining dust or debris, ensuring a clean and smooth surface.

Image

Priming the deck is the next step, and depending on the paint you select, a marine-grade primer may be necessary. This primer helps the paint adhere to the surface more effectively and improves durability. When it comes to painting, apply the non-skid paint with a brush or roller, ensuring even coverage across the deck. It’s important to apply multiple thin layers rather than one thick coat, as this improves the durability and performance of the non-skid properties. Allow for sufficient drying time between each coat. Once the final layer is applied, give the paint ample time to cure before exposing the deck to foot traffic or water, as rushing this step can reduce the effectiveness and lifespan of the paint.

Maintenance Tips for Non-Skid Boat Deck Paint

To maintain the effectiveness of the non-skid surface, it’s important to clean the deck regularly using mild soap and water. Dirt and debris can accumulate over time, reducing traction and making the surface less safe. It’s also best to avoid using abrasive cleaners, as they can wear down the non-skid texture, diminishing its performance. Instead, opt for gentle cleaning methods that preserve the surface. In high-traffic areas, the paint may wear down over time. Periodic touch-ups or repainting may be necessary to maintain the non-skid properties, especially in areas that experience heavy use.

Top Non-Skid Deck Paint Brands

There are several reputable brands known for producing high-quality non-skid deck paints that combine durability, ease of use, and long-lasting performance. Interlux is recognized for its exceptional durability and UV resistance, making it an excellent choice for long-term use. TotalBoat offers a range of easy-to-apply paints that provide excellent traction and are favored by DIY boat owners. KiwiGrip is popular for its environmentally friendly formulation and customizable texture, allowing boaters to adjust the level of non-skid based on their needs. Rust-Oleum is a budget-friendly option known for its durability and resistance to water, making it a practical choice for those seeking a cost-effective solution.

Enhance Safety and Aesthetics with Non-Skid Paint

As you can see choosing the right non-skid deck paint is essential for ensuring both safety and aesthetics on your boat. By selecting a paint or additive that balances durability, ease of application, and visual appeal, you can enjoy a safer, more attractive deck that stands up to marine conditions. Investing in non-skid paint enhances your boating experience, providing peace of mind while also improving the overall appearance of your vessel. If you need any assistance selecting non skid boat paint feel free to contact the customer support team at Bottom Paint Store.

Essential Tips for Using MEKP Catalyst Safely and Effectively

Our customer service team fields a lot of questions when it comes to using MEKP (Methyl Ethyl Ketone Peroxide)  as a catalyst specifically for gelcoat applications. Here are some of the most frequently asked questions we receive and answers to help you with this critical compound.

What is the role of MEKP in gelcoat applications?

MEKP acts as a catalyst to initiate the curing process of the polyester resin in gelcoat, allowing it to harden and form a durable, protective layer on surfaces like boats, cars, and fiberglass structures.

The typical ratio is 1-2% MEKP by weight of the gelcoat. However, the exact amount can vary depending on the gelcoat formulation, ambient temperature, and desired curing time.

How does temperature affect the curing process with MEKP in gelcoat?

Higher temperatures accelerate the curing process, while lower temperatures slow it down. It is crucial to adjust the MEKP amount based on the working environment to achieve the best results.

Can I adjust the gelcoat’s working time by changing the MEKP amount?

Yes, increasing the amount of MEKP will shorten the working time (pot life), while reducing it will extend the working time. However, altering the MEKP ratio too much can lead to incomplete curing or other issues.

What are the potential problems if too much or too little MEKP is used in gelcoat?


Using too much MEKP can cause the gelcoat to cure too quickly, leading to a brittle finish or excessive heat, which can cause warping. Too little MEKP can result in incomplete curing, leaving the surface tacky and vulnerable to damage.

What safety precautions should I take when using MEKP in gelcoat?

Always wear protective gloves, goggles, and a respirator. Work in a well-ventilated area and avoid any contact with skin or eyes. Store MEKP in a cool, dry place, and handle it carefully to prevent spills or exposure.

Can MEKP be mixed with pigments or additives in gelcoat?

Yes, but it is important to ensure that the pigments or additives are compatible with MEKP and do not interfere with the curing process. Always follow the manufacturer’s recommendations for mixing.

How do I know if the gelcoat has cured properly with MEKP?

Properly cured gelcoat will be hard, non-tacky, and have a consistent finish. If the surface is still tacky or soft after the recommended curing time, it may indicate insufficient MEKP or improper mixing.

What are the signs of improper curing in gelcoat when using MEKP?

Signs include a sticky or gummy surface, uneven hardening, poor adhesion, or excessive shrinkage. These issues can result from incorrect MEKP ratios, poor mixing, or adverse environmental conditions during curing.

How can I fix a gelcoat that hasn’t cured properly with MEKP?

If the gelcoat is only partially cured, additional MEKP can sometimes be applied, or the surface can be lightly sanded and recoated with a properly catalyzed mixture. In some cases, stripping the uncured gelcoat and reapplying it may be necessary.

These questions emphasize the importance of precise measurement, proper mixing, and environmental control when using MEKP as a catalyst in gelcoat applications to achieve the best results. MEKP is included free of charge with all Gelcoat purchased through Bottom Paint Store.

Duralux Aluminum Boat Green

Essential answers to your bottom paint questions

How many years does bottom paint last?

The lifespan of bottom paint typically ranges from one to three years, depending on several factors such as the type of paint, environmental conditions, water salinity, and how often the boat is used. Hard antifouling paints tend to last longer, sometimes up to three years, especially if the boat is used frequently. In contrast, ablative paints, which wear away over time to release fresh biocides, may need to be reapplied annually. Regular inspection and maintenance are key to ensuring the effectiveness and longevity of bottom paint.

How much is it to bottom paint a boat?

The lifespan of bottom paint varies depending on the type of paint used, environmental conditions, and maintenance practices. Ablative paints, which gradually wear away to expose fresh layers, typically last 1 to 2 years. Hard paints, like modified epoxy, are more durable and can last around 2 to 3 years. Factors such as the frequency of boat use, water conditions, and regular maintenance like hull cleaning can impact how long the paint remains effective. Regular inspection and touch-ups can help extend the paint’s protective qualities.

Does bottom paint slow down your boat?

Yes, bottom paint can slow down your boat, though the effect is typically minimal if the paint is properly applied. Bottom paint, especially if it’s rough or has accumulated layers over time, can create additional drag in the water. This drag can reduce the boat’s speed and fuel efficiency. However, the benefits of bottom paint, such as preventing marine growth and protecting the hull, usually outweigh the slight reduction in speed. To minimize this effect, some boat owners use smoother, racing-style bottom paints or ensure the hull is regularly cleaned and maintained.

What happens if I don’t bottom paint my boat?

If you don’t bottom paint your boat, marine organisms like algae, barnacles, and mussels can quickly accumulate on the hull. This growth, known as biofouling, can lead to several problems: increased drag in the water, which reduces speed and fuel efficiency; potential damage to the hull’s surface, especially if barnacles or other hard growth attach themselves; and more 
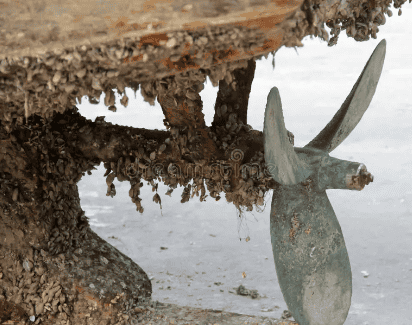
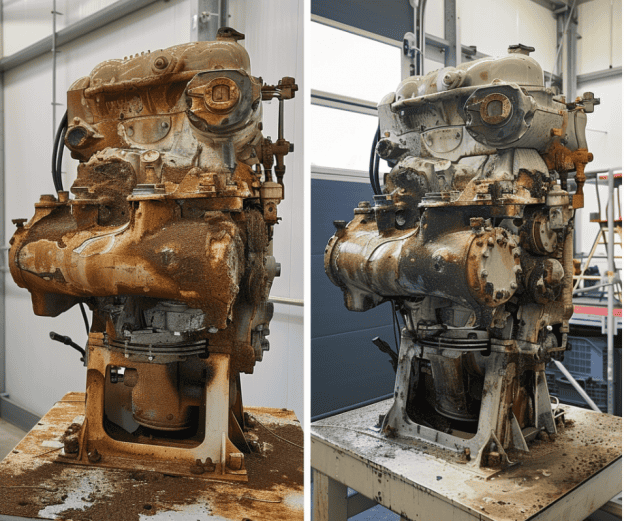
frequent and costly maintenance, as the hull will need to be cleaned regularly to remove the buildup. Over time, the lack of protection can also lead to corrosion, particularly in metal hulls or parts, compromising the boat’s performance and lifespan.

Marine Varnish: How to Choose, Apply, and Maintain for Long-Lasting Protection

Introduction to Marine Varnish

Marine varnish is a specially formulated protective coating designed to safeguard wood in marine environments. Whether you’re a boat owner or someone who enjoys wooden outdoor furniture, marine varnish plays a crucial role in preserving the beauty and integrity of your wood surfaces. This varnish is engineered to withstand the harsh conditions of marine environments, including intense sunlight, moisture, and saltwater exposure. The primary benefits of marine varnish include UV protection, which prevents the wood from graying or fading, water resistance to guard against rot and swelling, and enhanced durability, ensuring the wood remains strong and beautiful for years to come.

Marine varnish, folks, is like the unsung hero of wood preservation. It’s the tough, gritty stuff that stands between your boat’s beautiful woodwork and the relentless assault of Mother Nature. Whether you’re cruising the high seas or just kicking back on some well-crafted outdoor furniture, marine varnish is what keeps your wood looking good and standing strong. It’s built to take a beating—from blistering sun, soaking rain, and even the salty spray of the ocean. This stuff doesn’t just sit there; it fights back, keeping your wood from graying, cracking, or rotting. In short, it’s the bodyguard your wood needs to stay tough, beautiful, and ready for whatever the elements throw at it.


Types of Marine Varnish

When it comes to choosing the right marine varnish, it’s essential to understand the different types available, each offering distinct advantages depending on your specific needs.

Traditional Varnish:

Pros: Provides a warm, classic finish with excellent depth and clarity. It is easy to apply and can be repaired easily.

Cons: Requires multiple coats and regular maintenance. It may take longer to dry between coats.

Polyurethane Varnish:

Pros: Highly durable with strong resistance to scratches and chemicals. It provides a hard, glossy finish that requires less maintenance.

Cons: Can be more challenging to apply smoothly and is less flexible, which may lead to cracking over time.

Epoxy-Based Varnish:

Pros: Offers superior protection against water and UV rays. It bonds well to wood and provides a thick, durable layer.

Cons: More expensive and harder to apply, with limited flexibility, which may result in brittleness over time.

Each type of varnish has its strengths and weaknesses, making it important to match the product to your specific application and desired finish.

How to Choose the Right Marine Varnish

Selecting the right marine varnish involves considering several key factors:

Wood Type: Different woods react differently to varnishes. Hardwoods, such as teak and mahogany, may require different varnishes than softer woods like pine.

Exposure to Elements: Consider the environment where the wood will be used. For example, wood exposed to direct sunlight and saltwater will need a varnish with strong UV and water resistance.

Desired Finish: Some varnishes offer a high-gloss finish, while others provide a matte or satin appearance. Your aesthetic preferences will guide this choice.


Factor Traditional Varnish Polyurethane Varnish Epoxy-Based Varnish
Best For Classic finishes Durability Superior protection
Ease of Application Easy Moderate Challenging
UV Protection Moderate Good Excellent
Water Resistance Good Excellent Superior


Step-by-Step Application Process

Applying marine varnish properly is key to achieving a smooth, durable finish. Follow these steps for the best results:

Surface Preparation:

Sand the wood surface to remove any old varnish, dirt, or debris. Start with coarse sandpaper and gradually move to finer grits.

Wipe the surface clean with a tack cloth to remove dust.

Applying the Varnish:

Stir the varnish gently to avoid bubbles. Use a high-quality, natural bristle brush for application.

Apply the first coat thinly, brushing in the direction of the wood grain. Allow it to dry according to the manufacturer’s instructions.

Lightly sand the surface between coats to ensure adhesion and smoothness.

Number of Coats:

Typically, 5-7 coats are recommended for optimal protection. The first few coats should be thinned for better penetration, followed by full-strength applications.

Drying Times:

Allow sufficient drying time between coats, usually 24 hours, to prevent issues like tackiness or uneven finish.

Tips:

Work in a dust-free environment to prevent particles from settling on the wet varnish.

Avoid over-brushing, which can lead to bubbles or brush marks.

Maintenance and Reapplication Tips

Maintaining marine varnish is essential for preserving its protective qualities. Here’s how to keep your varnished wood in top condition:

Regular Inspection:

Periodically check for signs of wear, such as dullness, cracking, or peeling. Early detection allows for easier repairs.

Cleaning:

Clean the varnished surface with mild soap and water. Avoid harsh chemicals that can damage the varnish.

Reapplication:

When the varnish begins to show signs of wear, lightly sand the surface and apply a fresh coat. This can extend the life of the varnish and keep the wood protected.

Seasonal Maintenance: In harsh environments, consider a touch-up or reapplication before the start of each season.


Common Problems and Troubleshooting

Even with the best preparation, issues can arise. Here’s how to handle common problems:

Peeling: Often caused by poor surface preparation or applying varnish in humid conditions. Sand down the affected area and reapply.

Cracking: Usually due to applying too thick a coat or using a varnish with low flexibility. Sand lightly and apply a more suitable varnish.

Bubbles: Caused by over-brushing or stirring the varnish too vigorously. Lightly sand the bubbles and recoat, taking care to avoid the same mistakes.


FAQs About Marine Varnish

Can marine varnish be used on outdoor furniture?

Yes, marine varnish can be used on outdoor furniture to protect against moisture and UV rays.

How long does marine varnish last?

With proper application and maintenance, marine varnish can last anywhere from 1 to 3 years before reapplication is needed, depending on exposure conditions.

Is marine varnish suitable for all types of wood?

Marine varnish is ideal for most hardwoods and softwoods, but it’s important to choose the right type of varnish for your specific wood.

Can I apply marine varnish over old varnish?

It’s best to sand down the old varnish to ensure a smooth, even surface before applying new coats.


Picking the right marine varnish and putting it on the right way isn’t just important—it’s downright necessary if you want your wood to survive out there in the wild. You’ve got to match the varnish to the job, slap it on with care, and keep an eye on it over time. Do that, and your wood will stay tough, good-looking, and ready for anything. Whether you’re sprucing up a boat or some backyard furniture, marine varnish is your wood’s best defense against the elements, keeping it in tip-top shape for years to come.


What’s the Difference Between Propeller Paint and Foul-Release Coatings?

If you own a boat you know keeping things running smoothly is crucial. A big part of this is stopping the inevitable marine gunk and fouling from sticking to your propeller. You’ve got two main ways to handle this issue: propeller paint and foul-release coatings. Depending on your vessel and your needs, either can do the job, however there are significant differences. Let’s break down how they are different so you can determine which might be best for you.

Understanding Propeller Paint

Propeller paint, also known as antifouling paint, is specifically designed to prevent the growth of marine organisms on propellers and other submerged parts of a vessel such as outdrives. This type of paint contains biocides, which are chemical substances that deter organisms such as barnacles, algae, and mussels from attaching to the surface.

Smart Solution Outdrive Paint is the next generation in antifouling technology and is engineered to be the most effective environmentally friendly antifoulant available for outdrives.

Composition of Propeller Paint

Propeller paints are typically composed of:

  • Biocides: These are the active ingredients that prevent biofouling. Common biocides include copper-based compounds and other organic biocides.
  • Binders: These materials help the paint adhere to the surface of the propeller and gradually release the biocides over time.
  • Solvents: These are used to dissolve the binders and biocides, ensuring a smooth application.

Advantages of Propeller Paint

  1. Effective Biofouling Prevention: The biocides in propeller paint are highly effective at preventing the growth of marine organisms.
  2. Cost-Effective: can be more affordable than foul-release coatings.
  3. Easy Application: It can be applied using conventional painting methods and does not require specialized equipment.

Disadvantages of Propeller Paint

  1. Environmental Impact: The biocides used in propeller paint can be harmful to marine life and the broader ecosystem. Smart SoluEnvironmentally Friendly: Yes. Copper-Free, Metal-Free 
  2. Regular Maintenance: Propeller paint needs to be reapplied regularly, usually every one to two years, to maintain its effectiveness.
  3. Potential for Surface Damage: The abrasive nature of some biocides can cause damage to the propeller surface over time.

Understanding Foul-Release Coating

Foul-release coatings, on the other hand, are non-toxic alternatives designed to minimize the adhesion of marine organisms without the use of biocides. These coatings create a slick, low-friction surface that makes it difficult for organisms to attach and easy for them to be washed away by water movement.

propglide foul release coating

PropGlide™ is foul-release coating system designed for use on underwater propellers and running gear.


Composition of Foul-Release Coating

Foul-release coatings are typically composed of:

  • Silicone or Fluoropolymer Bases: These materials provide the slick, low-friction surface that characterizes foul-release coatings.
  • Additives: These are included to enhance the durability and performance of the coating.

Advantages of Foul-Release Coating

  1. Environmentally Friendly: Foul-release coatings do not contain harmful biocides, making them a more eco-friendly option.
  2. Long-Lasting Protection: These coatings typically last longer than propeller paint, often up to five years, reducing the frequency of reapplication.
  3. Surface Protection: The smooth surface reduces drag, improving fuel efficiency and protecting the propeller from physical damage.

Disadvantages of Foul-Release Coating

  1. Higher Initial Cost: The initial application of foul-release coatings can be more expensive than propeller paint.
  2. Complex Application Process: Applying foul-release coatings usually requires specialized equipment and expertise.
  3. Limited Effectiveness in Static Conditions: Foul-release coatings are most effective when the vessel is in motion, as water flow helps to remove organisms. In static conditions, some fouling may still occur.

Comparative Analysis: Propeller Paint vs. Foul-Release Coating

Effectiveness in Biofouling Prevention

Propeller paint is highly effective due to its biocidal properties. However, its effectiveness diminishes over time as the biocides are depleted. In contrast, foul-release coatings rely on their physical properties to deter fouling and maintain effectiveness over a longer period, although they may be less effective in static conditions.

Environmental Impact

Foul-release coatings for marine propellers have a clear advantage in terms of environmental impact, as they do not contain harmful biocides. Propeller paints, while effective, contribute to the accumulation of toxic substances in marine environments, posing a risk to aquatic life.

Cost and Maintenance

While propeller paint is generally more affordable upfront, it requires more frequent reapplication, leading to higher long-term maintenance costs. Foul-release coatings, although more expensive initially, offer longer-lasting protection and reduce the frequency of maintenance interventions.

Application Process

The application of propeller paint is straightforward and can be done using standard painting techniques. Foul-release coatings, however, require a more complex application process involving specialized equipment and expertise, which can increase the overall cost and time required for application.

Choosing the Right Solution for Your Vessel

The choice between propeller paint and foul-release coating depends on various factors, including environmental considerations, budget, maintenance capabilities, and the operational profile of the vessel. For those prioritizing eco-friendliness and long-term cost savings, foul-release coatings are an excellent choice. Conversely, if upfront cost and ease of application are primary concerns, propeller paint may be more suitable.

So, here’s the bottom line: whether you go with propeller paint or foul-release coatings, both will help keep your boat free from all the nasty stuff that likes to stick to it. By getting to know the ins and outs of each option, you can choose the one that fits your needs best—balancing how well it works, its impact on the environment, cost, and how much upkeep it requires. If you need any assistance in helping you make the right decision for your needs feel free to contact the team at Bottom Paint Store.


A Step-by-Step Guide to Descaling Your Boat’s Engine

Keeping your boat’s engine in tip-top shape is key to making sure it runs like a dream and lasts a long time. One job you can’t skip is descaling the engine—getting rid of all those pesky mineral deposits that build up over time. This guide will show you how to descale your engine, step by step, nice and easy. Plus, we’ll give you some pointers on picking the right eco-friendly descaler that also happens to be highly effective. Let’s dive in!

Why Descale Your Boat’s Engine?

Mineral deposits, primarily calcium, and lime, can build up inside your boat’s engine cooling system, leading to reduced efficiency, overheating, and potential engine damage. Regular descaling helps maintain optimal performance and prevents costly repairs.

Choosing the Right Descaler

When selecting a marine descaler, consider the following factors:

Compatibility: Ensure the descaler is suitable for your engine type (inboard, outboard, or sterndrive).

Effectiveness: Look for products with proven results in dissolving mineral deposits.

Environmental Impact: Look for eco-friendly descalers that are biodegradable and non-toxic such as Hammerhead Marine Descaler by Bright Bay.

Ease of Use: Choose a product with clear instructions and easy application methods.

Safety Precautions

Before you start descaling, keep these safety tips in mind:

Read Instructions: Carefully read the descaler’s label and instruction manual.

Protective Gear: Wear gloves, safety glasses, and protective clothing to avoid skin and eye contact with the descaler.

Ventilation: Ensure you work in a well-ventilated area to avoid inhaling fumes.

Engine Off: Always descale with the engine turned off and cooled down to prevent accidents.

Step-by-Step Descaling Guide

Step 1: Gather Your Materials

  • Marine descaler
  • Bucket
  • Hose
  • Funnel
  • Protective gear (gloves, safety glasses, protective clothing)
  • Screwdriver or wrench (if needed for access)

Step 2: Prepare the Engine

Cool Down: Ensure the engine is turned off and has cooled down completely.

Disconnect Battery: For added safety, disconnect the boat’s battery to prevent any electrical hazards.

Step 3: Access the Cooling System

Locate Inlet/Outlet Hoses: Identify the inlet and outlet hoses of the engine’s cooling system.

Disconnect Hoses: Use a screwdriver or wrench to carefully disconnect the hoses. Place the ends in a bucket to catch any remaining water.

Step 4: Prepare the Descaler Solution

Dilute Descaler: Depending on the product instructions, dilute the descaler in a bucket with water if necessary.

Mix Thoroughly: Ensure the solution is well-mixed and ready for use.

Step 5: Introduce the Descaler Solution

Attach Funnel to Inlet Hose: Securely attach a funnel to the inlet hose of the cooling system.

Pour Descaler Solution: Slowly pour the descaler solution into the cooling system through the funnel.

Let It Sit: Allow the solution to sit in the cooling system for the recommended time, usually between 30 minutes to an hour.

Step 6: Flush the System

Reconnect Hoses: Reattach the inlet and outlet hoses securely.

Flush with Fresh Water: Use a hose to flush fresh water through the cooling system, ensuring all descaler and dissolved deposits are thoroughly rinsed out.

Check for Leaks: Inspect all hose connections for any leaks and tighten if necessary.

Step 7: Final Steps

Reconnect Battery: Reconnect the boat’s battery.

Test the Engine: Start the engine and let it run for a few minutes to ensure proper operation and no remaining blockages.

Dispose of Waste: Dispose of any used descaler solution and water according to local environmental regulations.

Conclusion

If you want your boat’s engine to run smoothly and last longer, you’ve got to descale it regularly. It’s as simple as that. Follow this step-by-step guide, and you’ll be able to descale your engine

Effective Wood Rot Repair for Boats

Wood rot is a common and potentially devastating issue for boat owners. This silent invader can compromise the structural integrity and aesthetic appeal of your vessel, leading to costly repairs if not addressed promptly. Understanding how to effectively repair boat wood rot is crucial for maintaining the longevity and performance of your boat. In this article, we’ll explore the challenges of wood rot and provide a comprehensive guide to repairing it, with a spotlight on the benefits of using Rot Stop Epoxy by FGCI.

Understanding Wood Rot

Wood rot is caused by fungi that thrive in moist environments. These fungi break down the cellulose and lignin in wood, leading to decay. Boats, constantly exposed to water and humidity, are particularly susceptible to this issue. Common areas affected by boat wood rot include the hull, deck, and cabin structures. Early detection is key to preventing extensive damage. Signs of wood rot include soft, spongy wood, discoloration, and a musty odor. Regular inspections can help identify problem areas before they worsen.

Preparing for Repair

Before diving into the repair process, it’s essential to gather the necessary tools and materials. For an effective repair, you will need:

  • Rot Stop Epoxy 
  • Protective gloves and eyewear
  • Sandpaper or a sanding tool
  • A chisel or scraper
  • A brush for applying epoxy
  • Clean cloths for wiping
  • Steps for Effective Wood Rot Repair
  • Identify the Affected Area

Conduct a thorough inspection of your boat to locate all areas affected by wood rot. Mark these areas clearly to ensure they are treated comprehensively.

Remove Damaged Wood

Using a chisel or scraper, remove the decayed wood. It’s crucial to eliminate all affected material to prevent the rot from spreading. Be careful not to damage surrounding healthy wood.

Prepare the Surface

Sand the area around the removed wood to create a smooth surface for the epoxy. This step ensures proper adhesion of the repair material.

Apply Rot Stop Epoxy

Rot Stop Epoxy by FGCI is designed specifically for wood rot repair. Its low viscosity allows it to penetrate deeply into the wood, stabilizing and reinforcing the damaged area. Mix the epoxy according to the manufacturer’s instructions. Using a brush, apply the epoxy generously to the prepared area, ensuring it seeps into all cracks and crevices.

Rot Stop Epoxy is a unique, 100% solids, low modulus, moisture-insensitive epoxy system. Unlike rigid hard cures, it remains flexible, accommodating temperature-driven expansion stresses common in most construction applications.

Allow to Cure

Let the epoxy cure fully. This process can take several hours to a day, depending on the temperature and humidity. The cured epoxy forms a strong bond with the wood fibers, restoring structural integrity and preventing further decay.

Finish the Repair

Once the epoxy has cured, sand the surface smooth. You can then apply paint or varnish to match the surrounding wood, ensuring a seamless repair.

Benefits of Rot Stop Epoxy by FGCI

  • Rot Stop Epoxy offers several advantages that make it an ideal choice for wood rot repair:
  • Superior Penetration: Its low viscosity allows deep penetration into the wood, reaching the root of the rot and stabilizing the area.
  • Strong Adhesion: Forms a durable bond with the wood fibers, reinforcing the damaged area and restoring structural integrity.
  • Waterproofing Properties: Creates a waterproof barrier, protecting the wood from future moisture infiltration.
  • Ease of Application: User-friendly with clear instructions, making it accessible for both professionals and DIY enthusiasts.
  • Durability: Resistant to UV rays, temperature fluctuations, and physical wear and tear, ensuring long-lasting repairs.

Wood rot is a formidable adversary for boat owners, but with the right tools and techniques, it can be effectively managed. Regular inspections and prompt repairs using quality products like Rot Stop Epoxy by FGCI can extend the life of your boat and enhance its performance. By following the steps outlined in this guide, you can tackle wood rot head-on, ensuring your vessel remains seaworthy and beautiful for years to come.


What is the Best Way to Maintain My Boat’s Paint Job?

Keeping your boat’s paint job in tip-top shape isn’t just about looking good—it’s about making sure your vessel stands up to the tough conditions out there on the water. A well-maintained paint job not only makes your boat a head-turner, but it also shields it from the rough and tumble marine waters. So, here are some tried-and-true tips to help you keep that paint job looking sharp and doing its job.

Regular Cleaning

Regular cleaning is the cornerstone of paint maintenance. Salt, grime, and marine growth can damage your boat’s paint if left unchecked. Here’s how to clean your boat properly:

  1. Rinse with Fresh Water: After each outing, rinse your boat with fresh water to remove salt and debris. This helps prevent salt from corroding the paint and other surfaces.
  2. Use Mild Detergents: Opt for marine-specific soaps that are gentle on the paint but tough on dirt. Avoid harsh chemicals that can strip away the paint’s protective layer.
  3. Soft Brushes and Sponges: Use soft-bristled brushes and non-abrasive sponges to clean the surface. Abrasive materials can scratch the paint, leading to premature wear and tear.

Hammerhead Hull Cleaner uses a unique acid-surfactant blend designed to remove marine growth, hard water stains, rust, and calcium buildup.

Regular Inspections

Frequent inspections allow you to catch and address minor issues before they become major problems. Here’s what to look for:

  • Blistering and Peeling: Check for any signs of blistering or peeling paint. These can indicate underlying issues such as water intrusion or improper surface preparation during the painting process.
  • Fading and Chalkiness: UV rays can cause paint to fade and become chalky over time. While some fading is inevitable, excessive chalkiness might indicate the need for a fresh coat of paint.
  • Scratches and Dings: Inspect for scratches and dings, especially in high-traffic areas. Touching up small scratches promptly can prevent them from expanding and causing more significant damage.

Protective Measures

Taking proactive steps to protect your boat’s paint can significantly extend its lifespan. Consider these protective measures:

  • Waxing: Regularly waxing your boat creates a protective barrier against UV rays, salt, and other contaminants. Aim to wax your boat at least twice a year, or more frequently if it’s exposed to harsh conditions.
  • Covers and Shades: When not in use, cover your boat with a breathable cover to shield it from the elements. If possible, store your boat in a shaded area to reduce UV exposure.
  • Fender Usage: Properly using fenders when docking can prevent scratches and dings from contact with docks and other boats.

3M™ Perfect-It™ Boat Wax is the final, brilliant step in achieving a truly professional marine finish.

Touch-Up and Repainting

Even with the best maintenance, touch-ups and repainting will eventually be necessary. Here’s how to handle them:

  1. Touch-Up Kits: Keep a touch-up kit on board for minor repairs. These kits typically include matching paint, brushes, and instructions for small fixes.
  2. Repainting Schedule: Depending on your boat’s usage and environmental exposure, a full repaint might be necessary every few years. Consult with a marine paint specialist to determine the best repainting schedule for your boat.

Professional Maintenance

Sometimes, professional maintenance is the best option to ensure your boat’s paint job remains in top condition. Consider professional services for:

  1. Detailed Cleaning: Professional detailers have the tools and expertise to perform a thorough cleaning, including hard-to-reach areas and stubborn stains.
  2. Advanced Repairs: For extensive damage or complex issues, professional repair services can ensure the job is done correctly and efficiently.
  3. Regular Inspections: Scheduling regular professional inspections can provide peace of mind and catch issues you might overlook.

Maintaining your boat’s paint job requires regular cleaning, frequent inspections, protective measures, and occasional touch-ups or professional maintenance. By following these tips, you can keep your boat looking great and protect it from the harsh marine environment. A well-maintained paint job not only enhances the beauty of your boat but also ensures its longevity and performance on the water. Happy boating!

Keeping your boat’s paint job in prime condition takes a bit of elbow grease—regular cleaning, frequent check-ups, some protective steps, and the occasional touch-up or call to a pro. By following these tips, and you’ll not only keep your boat looking fantastic but also shield it from the unforgiving marine elements. A sharp paint job doesn’t just make your boat look good; it also ensures it lasts longer and performs better out there on the water. 


Paint Calculator for Ablative/ Self Polishing Bottom Paints

Self-polishing ablative bottom paints are a type of marine coating designed to protect the hull of a boat from marine growth such as barnacles, algae, and other organisms. These paints work by gradually wearing away or “ablating” as the boat moves through water, continually exposing fresh biocide layers that prevent fouling. This self-polishing action ensures that the hull remains smooth and free of growth, which can improve fuel efficiency and overall performance. Unlike hard bottom paints that require sanding and reapplication, self-polishing ablative paints erode in a controlled manner, reducing the need for frequent maintenance.

They are particularly effective for boats that are regularly used, as the water movement facilitates the ablative process, keeping the hull in optimal condition. Self-polishing boat bottom paints are ideal for vessels that are frequently taken in and out of the water, such as those using trailers or lifts.

Determining the amount of ablative or self-polishing bottom paint your boat needs depends on several factors, including the size of your boat, the type of paint, and the number of coats you plan to apply.

Always consult the paint manufacturer’s recommendations for specific coverage details and consider buying a little extra to account for waste or touch-ups.

Most ablative or self-polishing bottom paints need two coats because they are designed to wear away over time. It’s always better to have a little more than not enough. On the other hand, most hard modified epoxy bottom paints only require a single thorough coat—just be sure not to miss any spots.

See Our List of Ablative/ Self Polishing Bottom Paints